

All prints are produced by WhiteWall, one of the world’s leading professional photo labs and a multi-year winner of the TIPA “Best Photo Lab Worldwide” award. Their works are exhibited in many of the world’s leading galleries for fine-art photography.
My photographs are printed on Hahnemühle FineArt Baryta, regarded as one of the finest – and also one of the most demanding and expensive – papers for museum-grade printing. Known for its exceptional characteristics, it produces prints with outstanding color reproduction and detail, deep blacks, and striking contrast.
FineArt Baryta is a high-gloss paper, but its textured surface adds depth and brilliance without the harsh mirror reflections often associated with glossy papers. Under controlled lighting, it enhances color, contrast, and perceived sharpness, which is why I use it for all exhibition- and collector-grade prints.
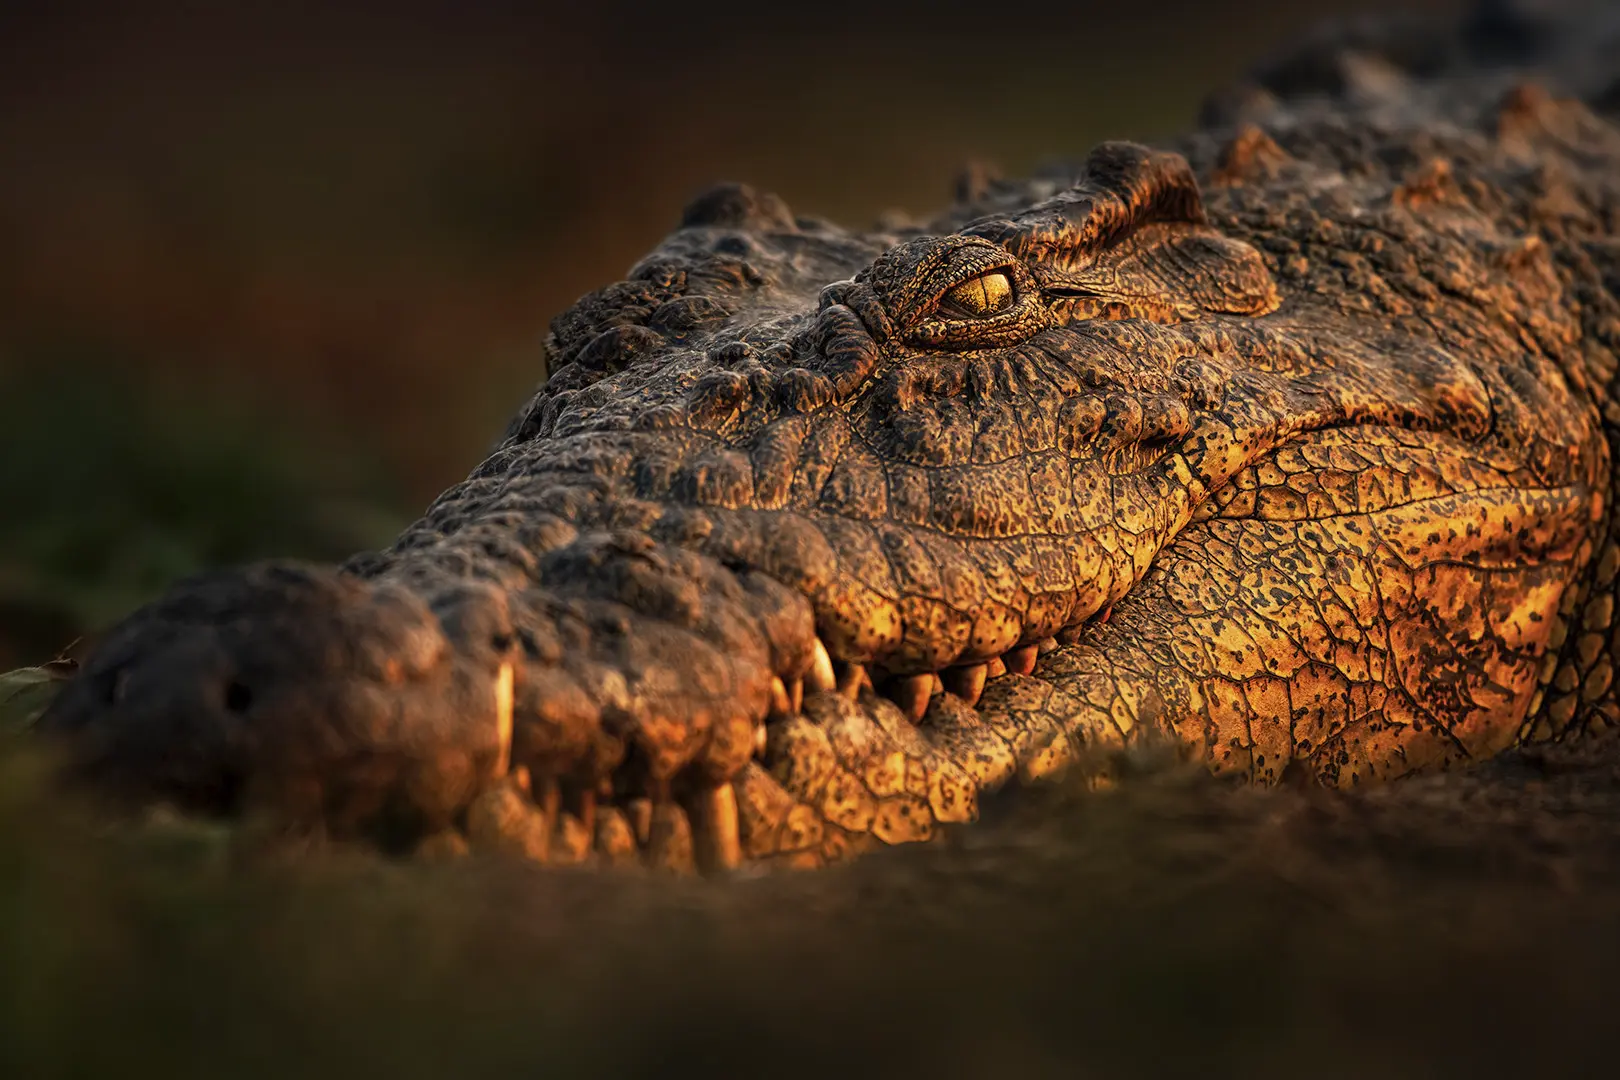
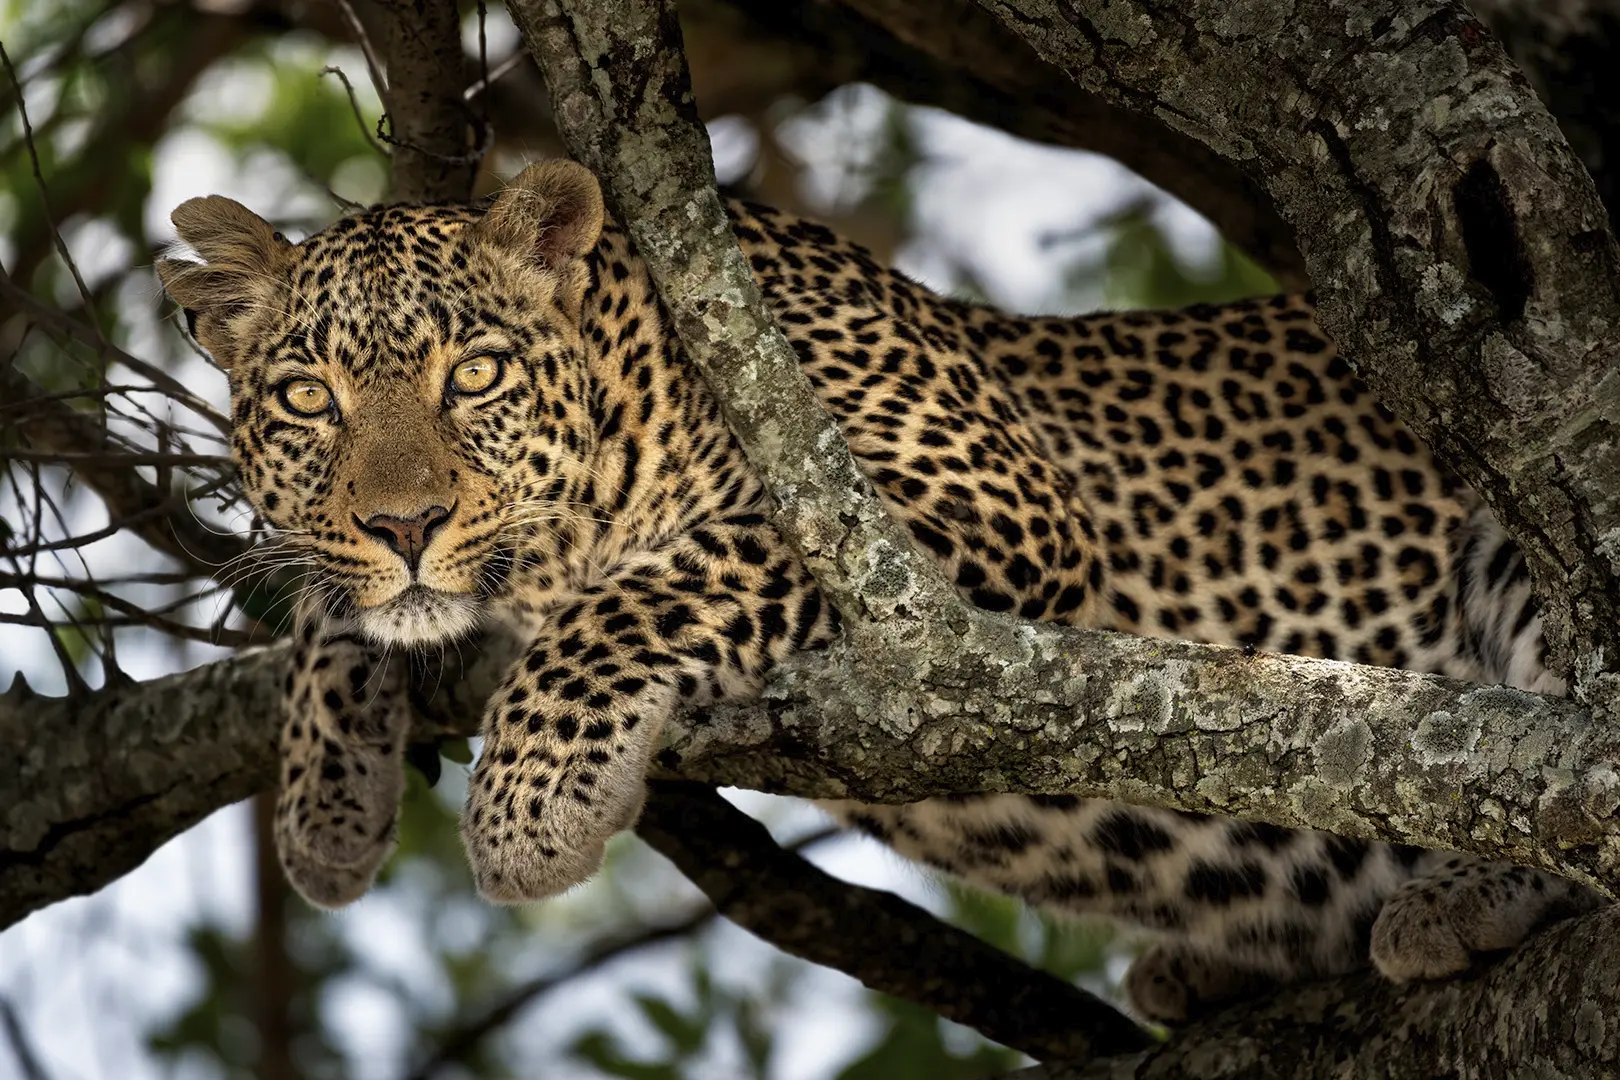
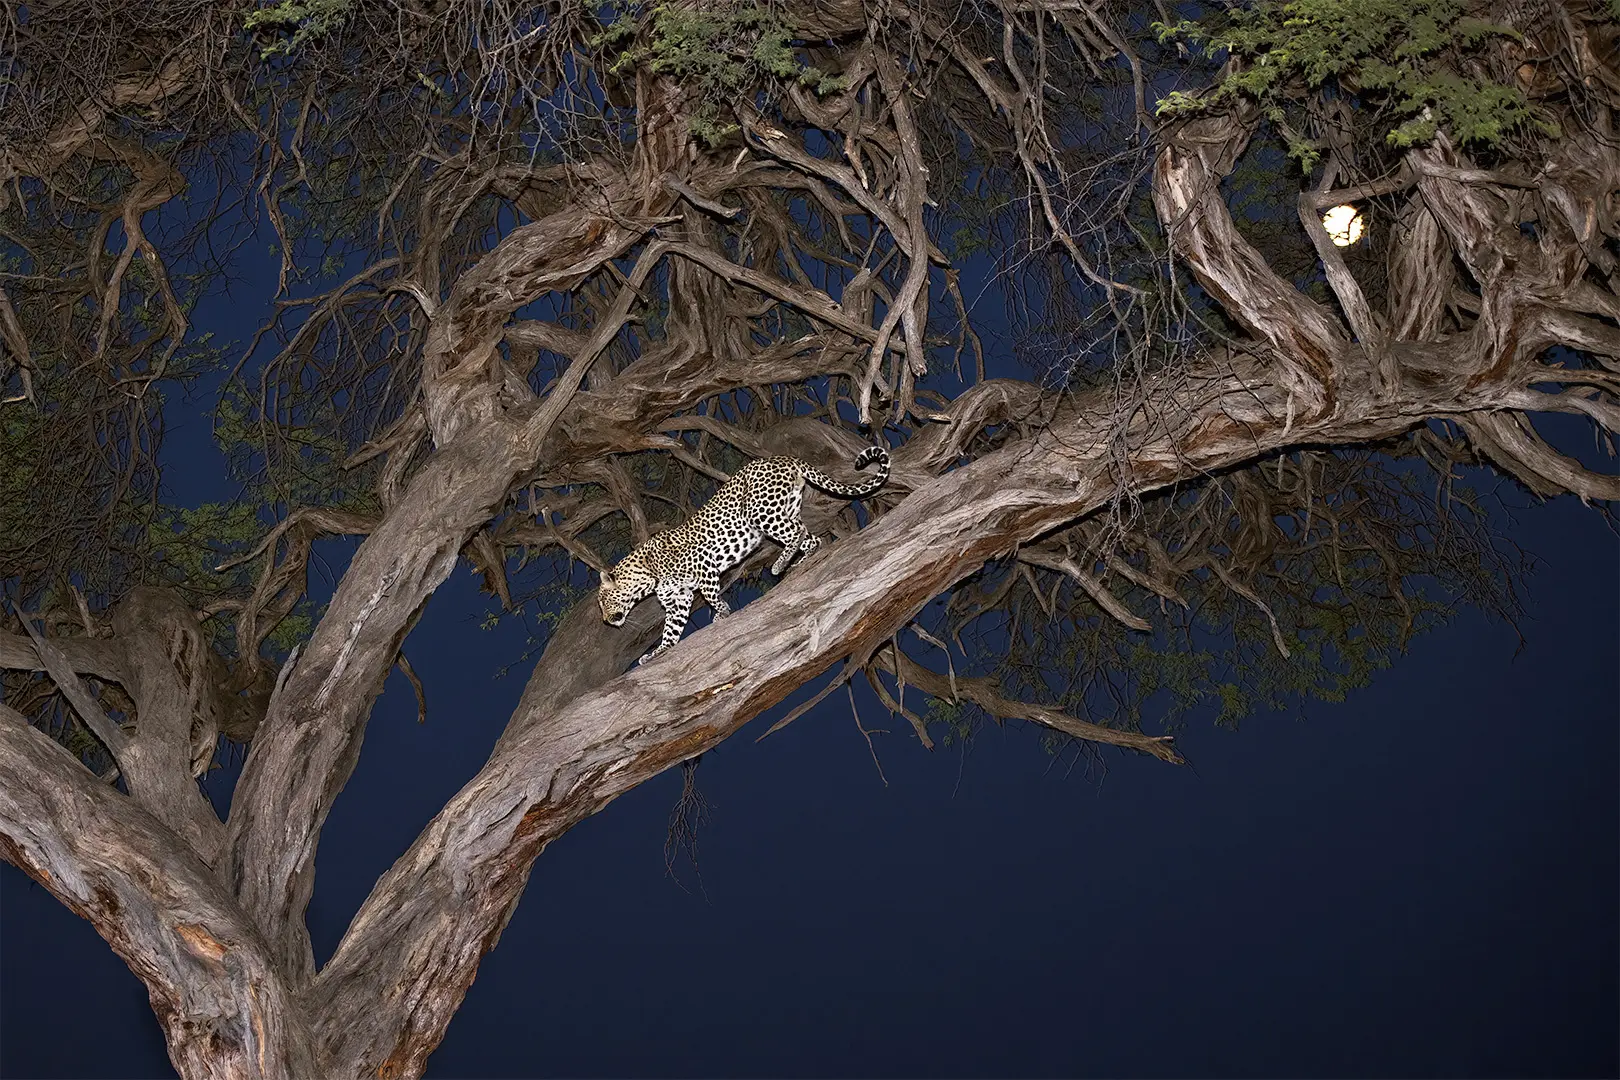
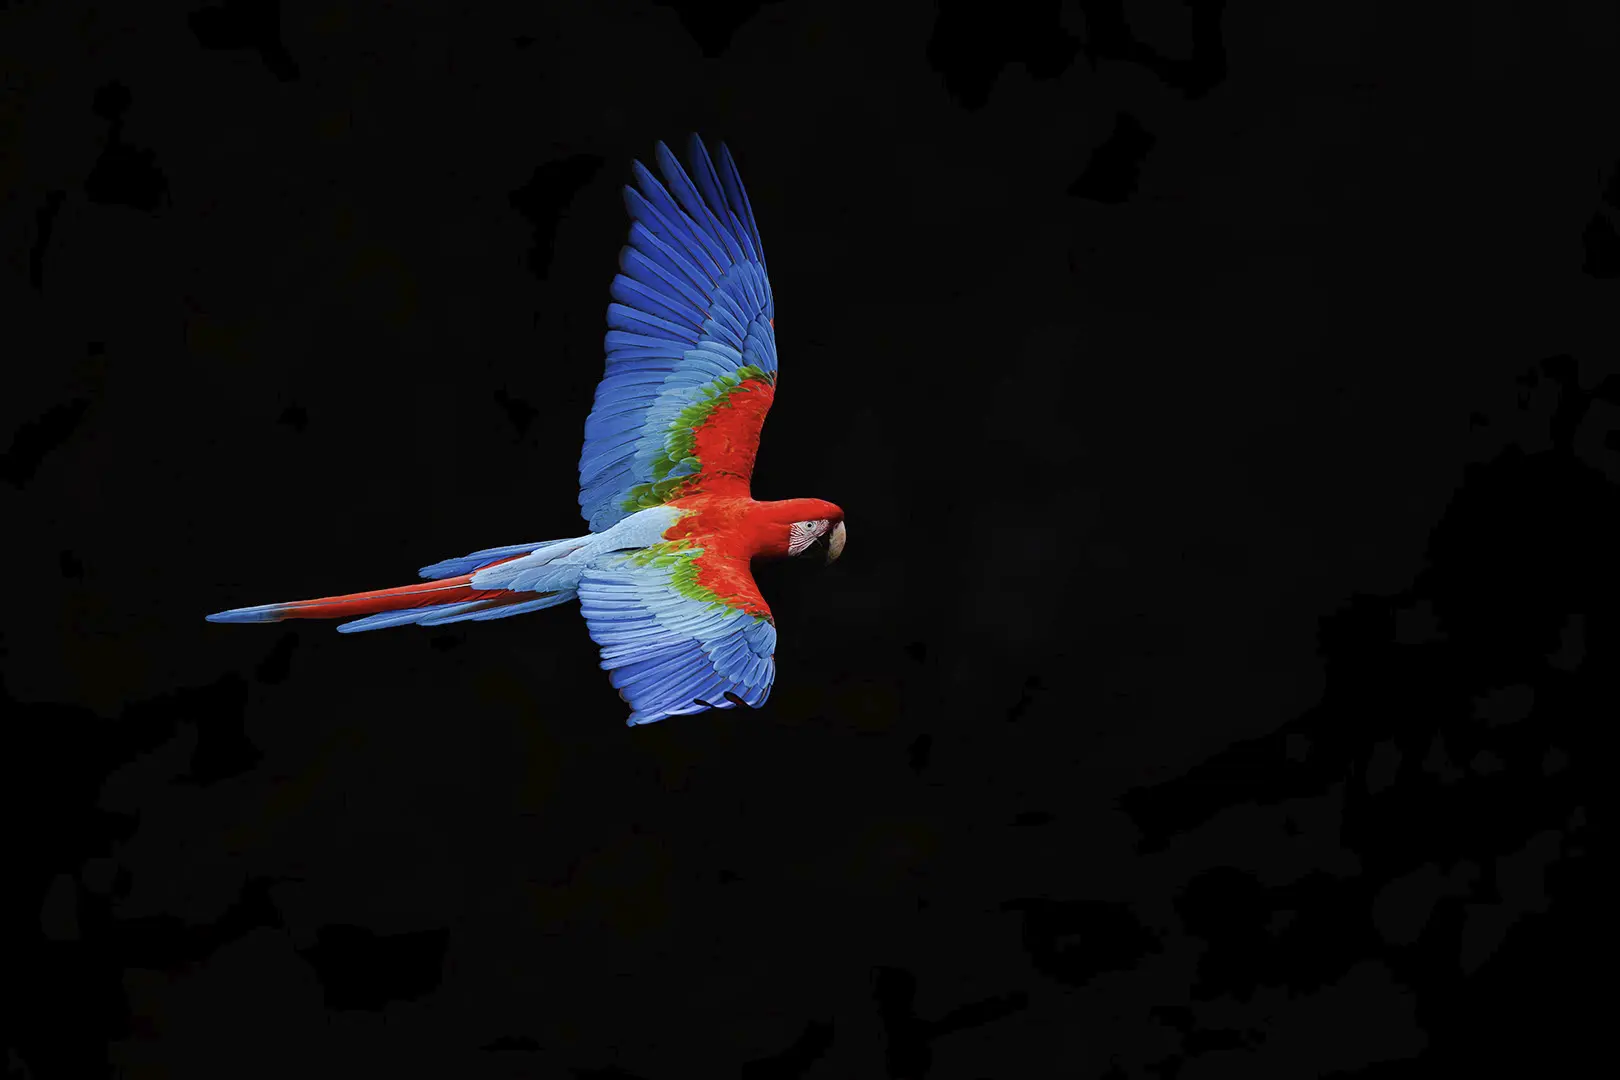
The baryta coating brings out every subtle tone and detail in fur, skin, and background—perfectly suited to the high dynamic range and fine textures typical of wildlife photography. It also renders saturated colors and delicate tonal transitions exceptionally well, preserving the warmth and atmosphere of natural light.
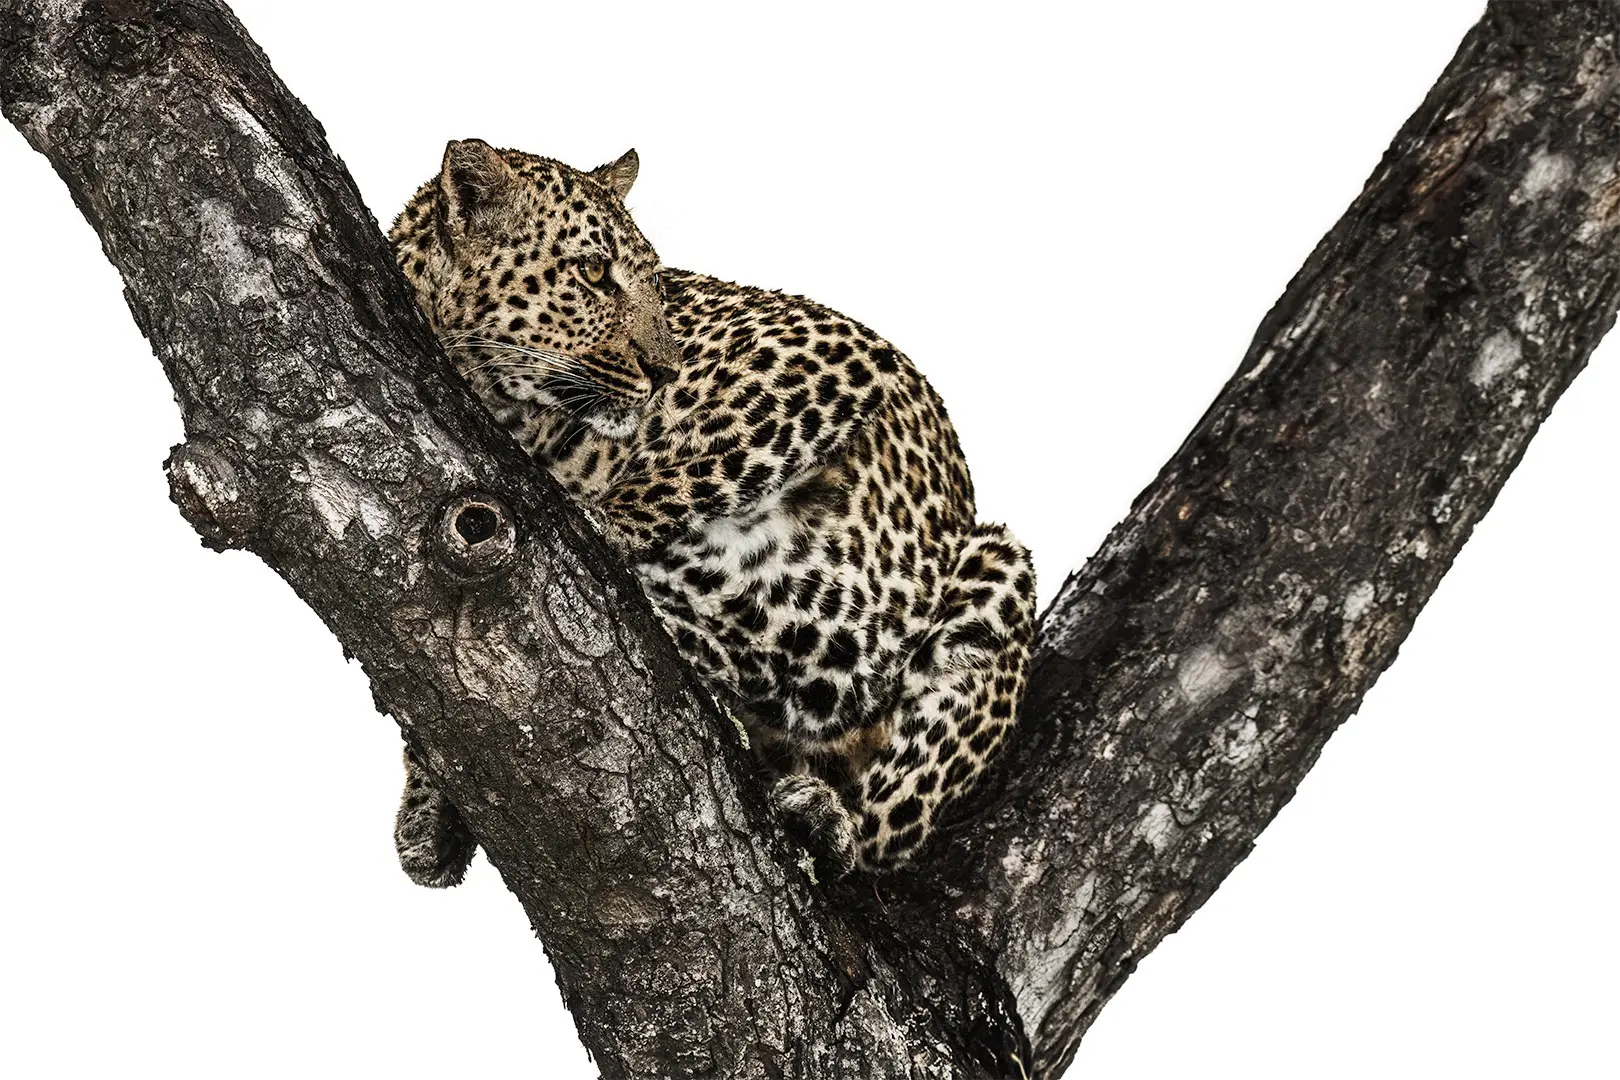
The paper’s bright-white base is a deliberate choice: high-key and white areas stay white and neutral rather than cream-toned. You can’t print whiter than the whiteness of the paper itself.
All these qualities make Hahnemühle FineArt Baryta my paper of choice for both color and black-and-white wildlife photography.
Hahnemühle FineArt Baryta
The photos displayed on the site are highly compressed and do not reflect the true quality or details of my FineArt prints. Additionally, various monitors, mobile displays on which this site is viewed will not reproduce the actual colors of the prints faithfully.
To appreciate the beauty, exceptional quality and true colors of my Fine Art prints, you have to see them with your own eyes and feel their texture.
If you are visiting this site on your mobile device, for the best viewing experience, please re-visit it on desktop. A much bigger desktop screen and a different desktop web design give a much better viewing experience. Due to the reasons of web design and mobile devices accessibility, photos, in different places of this website, may not be displayed in full; they may be cropped or displayed only partially. To see the photos in full, please see them in the Galleries or Virtual Exhibitions or on individual product pages.
Prints are currently offered unframed.
We are planning to offer framed prints in the nearest future. To stay up to date, you can choose to subscribe to our Newsletter and you will be immediately notified about this new possibility (and other upcoming features as well).
Should you require prints on other FineArt papers, specific media (e.g. aluminium) or on canvas, please Contact us.
Important Notice: To see full photos, please see them in Galleries or Virtual Exhibitions or individual product pages. Photos used elsewhere at this website may be cropped or displayed only partially (due to web design and accessibility reasons).
The original photos have a native full-frame 3:2 format (aspect ratio). It means the ratio of width to height is 3:2 (in horizontal orientation) or 2:3 (in vertical orientation). All the photos in the Galleries and Virtual Exhibitions are displayed in this native format (aspect ratio).
Prints are offered in the following standard dimensions (following the 3:2 format): 30×20, 45×30, 60×40, 75×50, 90×60, 105×70, 120×80 and 150×100 cm. These are the dimensions of the actual prints (printed area) without white borders. Dimensions with the white borders (default or of your choice) are called external dimenstions – you will see the external dimensions on the Product page after selecting the width of white borders.
The dimensions provided in inches are approximate as they were converted from centimeters and rounded.
Should you require a different crop or aspect ratio, please Contact us.
Not every photo may be available in all print dimesions. If the original photo resolution doesn’t allow to print big, such dimensions won’t be selectable on the Product page.
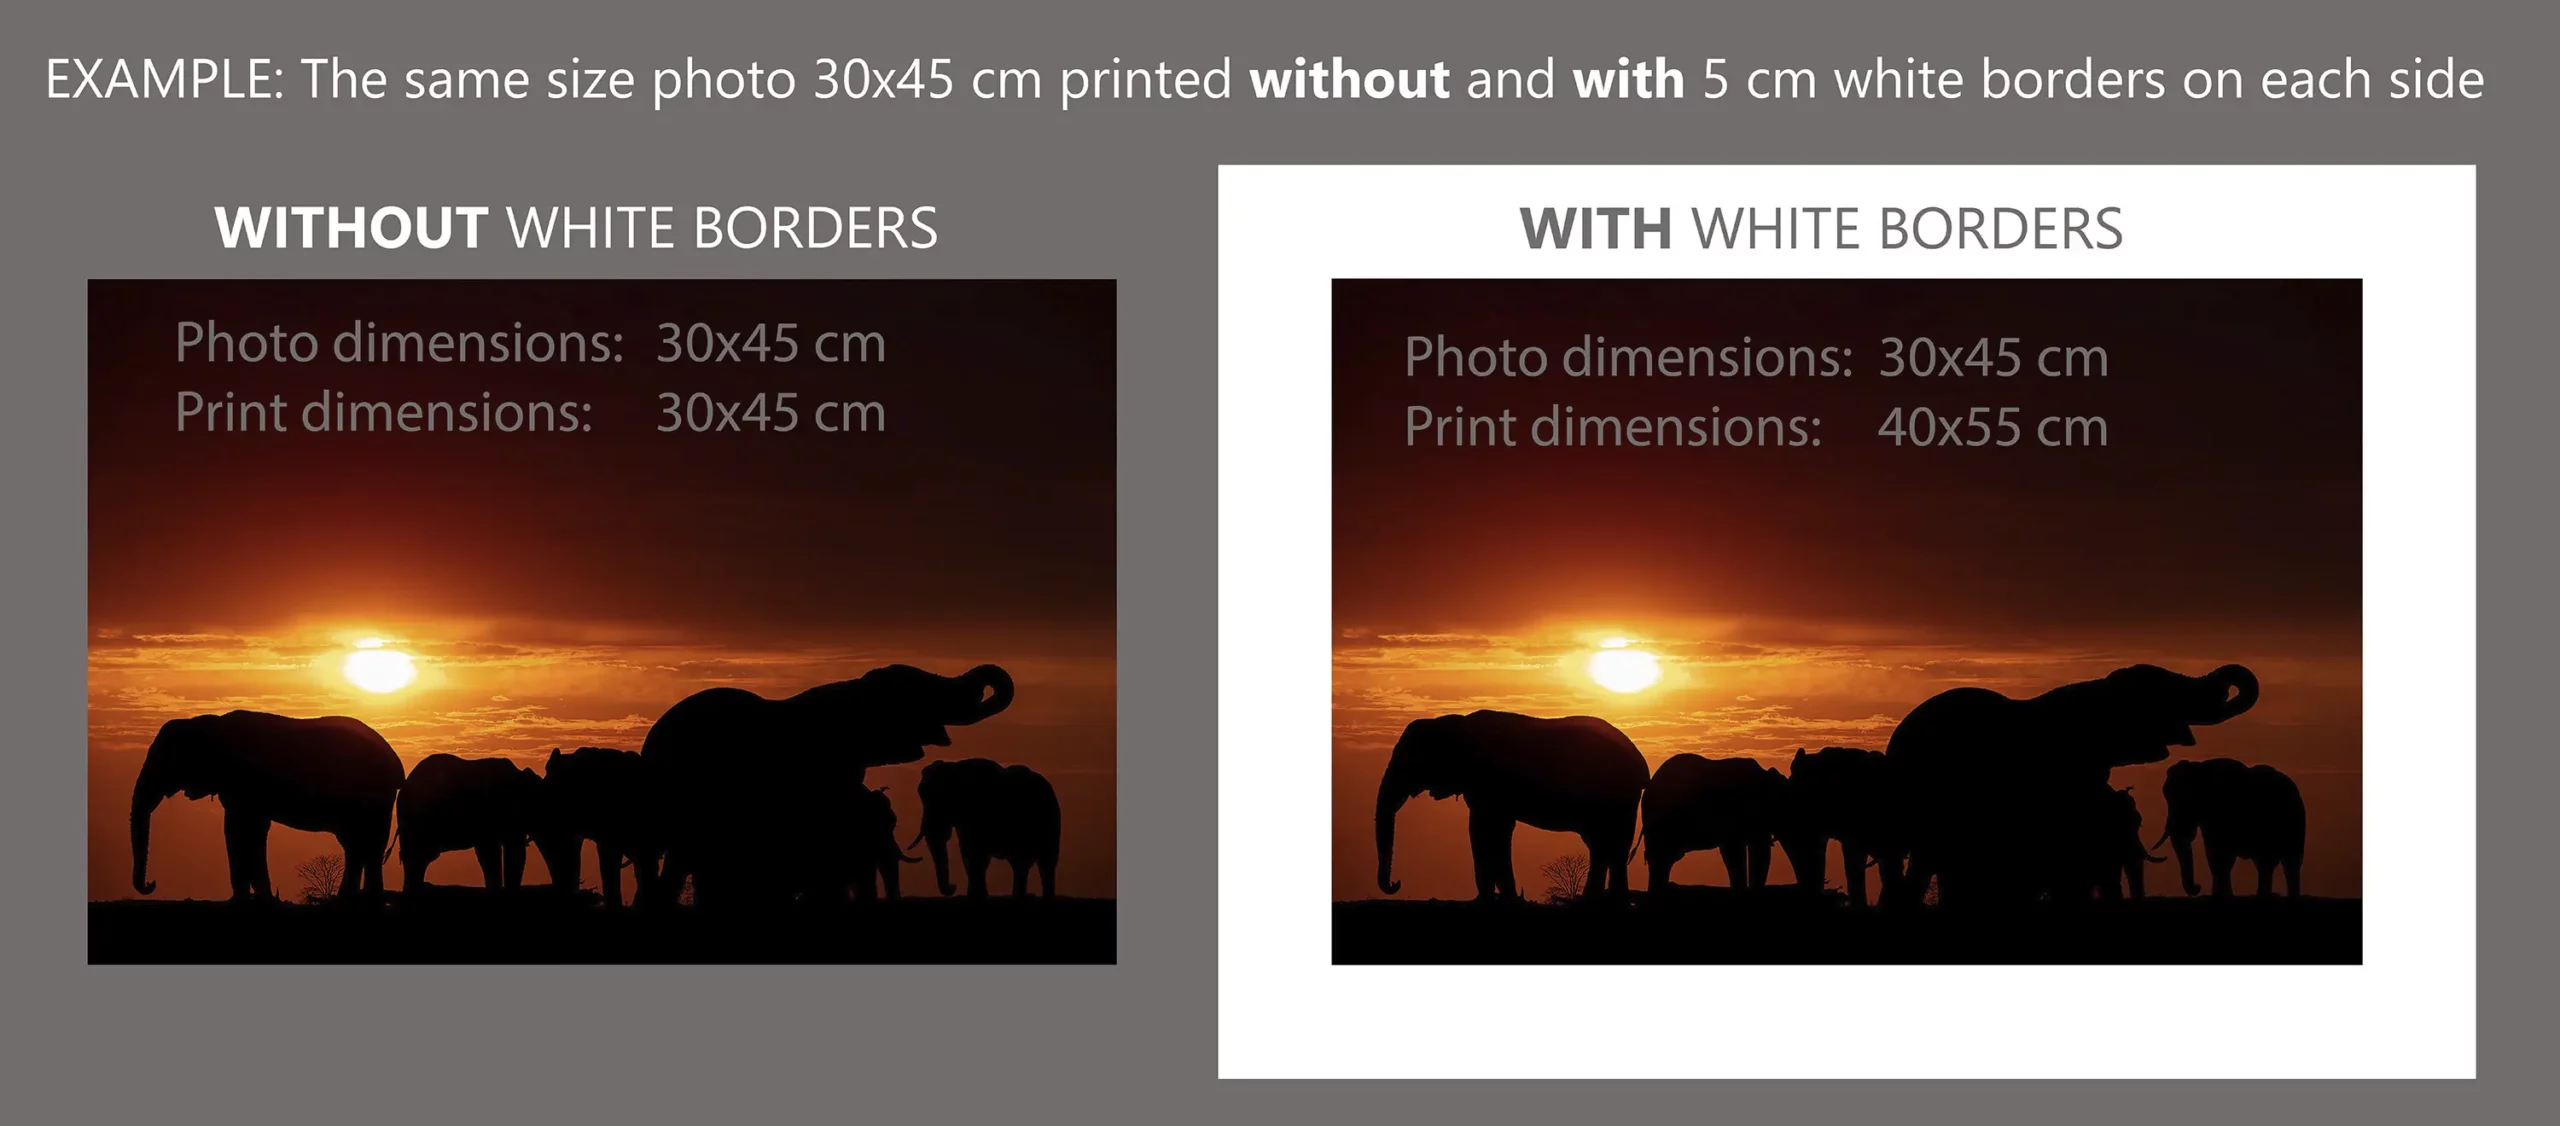
White framing borders are a matter of individual taste and framing style. Some clients prefer some breathing space for the print within the frame while others prefer tight framing.
Prints in all sizes are offered with default 1 cm white borders. They are primarily intended to facilitate photo handling (to avoid touching the printed area) and framing (to avoid covering the printed area by the frame itself).
Should you require wider white framing borders, you can select them on the Product page. Please, note that you do have to select one of the border options for the price to be displayed and to be able to add the print to the Cart.
For print sizes up to 120 cm (long edge), the available border widths are: 1 , 2, 3, 5, 8 or 12 cm. For the biggest prints of 150 cm, the available border widths are 1 or 2 cm.
Please, note that whatever border width you will choose, it does not affect the print size. The width of the selected white borders (the same on each side of the photo) adds up to the overall external dimensions. Simply put, whatever border width you will choose, it doesn’t come at the expense of the print dimensions; white borders don’t “shrink” the actual print dimensions.
The question is whether you really need wider borders and if so, how wide they should be relative to the photo itself because additional white borders do come with a higher price (due to a higher usage of expensive paper). To give you some idea, going from 1 cm default borders up to 12 cm will increase the print cost by app. 60-100% (depending on the print size).
White borders also provide some breathing space for the photo within the frame. The question is whether you want that breathing space to have the same beautiful surface texture as the print itself or not. If money is no issue and you can afford additional cost, then definitely go for it.
To achieve this breathing space effect it’s sometimes better to use the white (or color) background provided by your framer. On top of that you can also choose some other background color which may go very well with the photo and will match your interior as well. It’s a matter of individual preference or taste and the predominant colors in the photo. A professional framer should advise you what will work best for a specific photo and frame type.
If you are planning to frame the print without any borders/breathing space, then borders wider than 1 cm (default) or 2 cm don’t make any sense as they will most likely be cut off/covered partially or completely by your framer.
To give you some idea how the print would look like on your wall, what borders and framing style you may like, we offer you two unique tools to visualize how the print will look like on your wall. Please, check VIEW PHOTO IN YOUR ROOM and Augmented Reality (AR) tools as they may help you make up your mind.
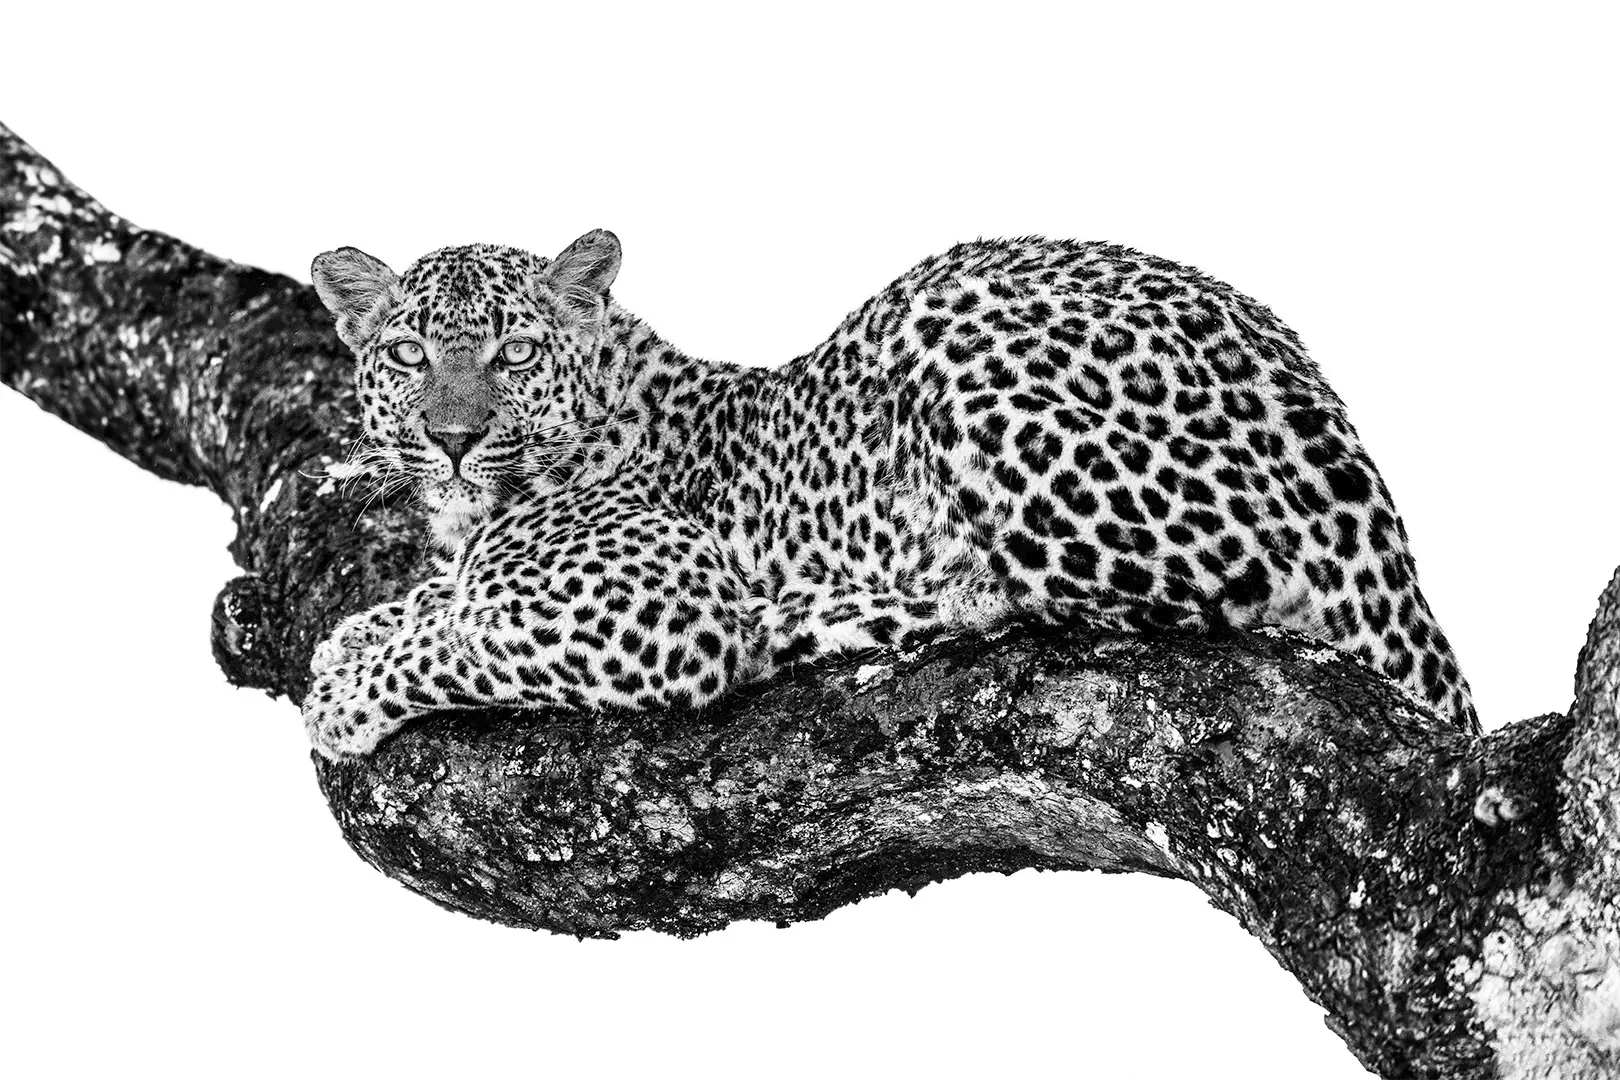
Some photos are offered exclusively as Black & White, simply because color doesn’t contribute to the photo, may compete with the subject of the photo or sometimes spoil the photo due to the lighting conditions it was taken in.
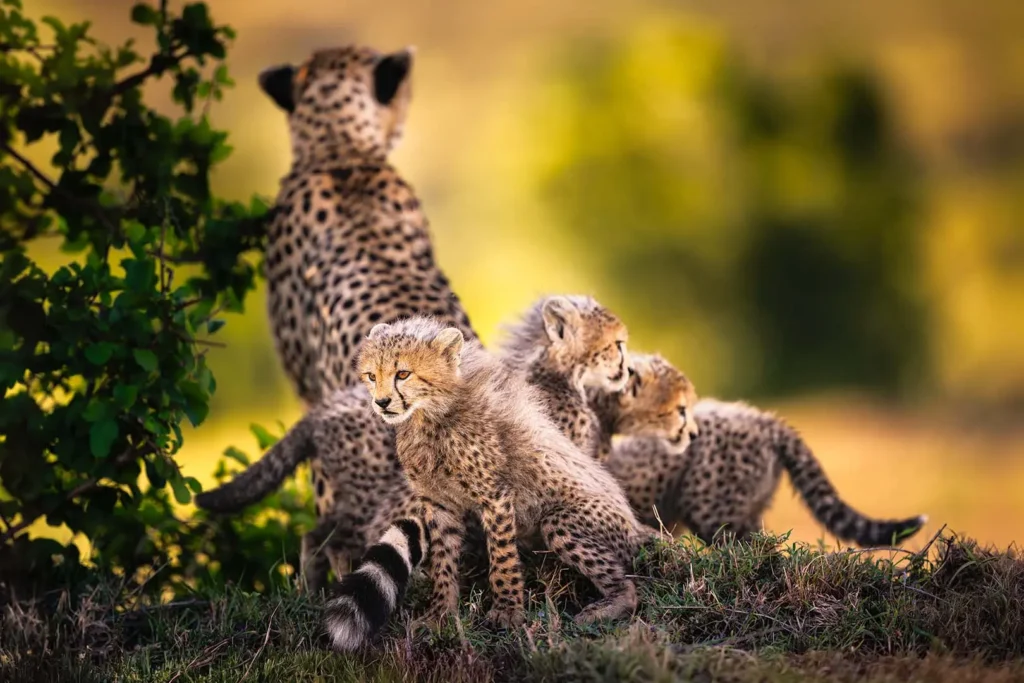
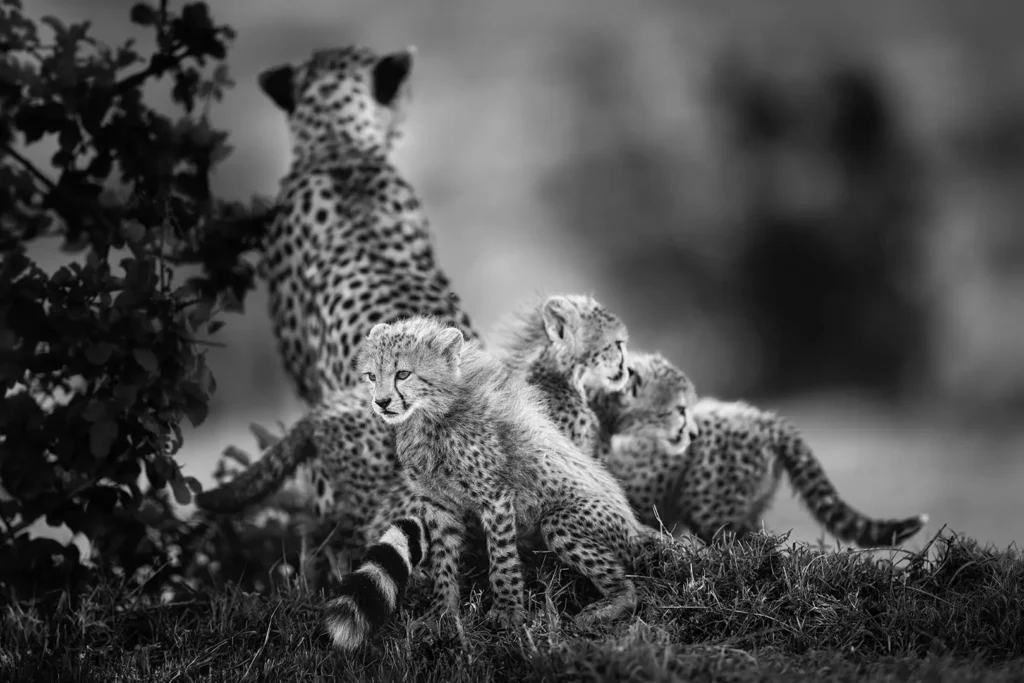
However, Black & White prints have some inherent beauty and character as well. Have a look at the cheetah photo taken in a beautiful morning light but even I was surprised how many viewers preferred the B&W version.
Many color photos can be converted to B&W and look really great. It’s a matter of individual taste or matching the interior you intend to hang your photo in.
If a given photo is not included in the Black & White Gallery and you would like to see the B&W version, just contact us and we will upload it.
Print prices displayed on the Shop, Product pages and in Virtual Exhibitions do NOT include taxes or shipment costs.
The total price is displayed on the Checkout page once you have selected your options and filled in your client information and shipping address.
Please, select the Taxes and Shipment tabs to get more information.
The base prices are in EUR and they are not subject to daily changes due to fluctuating rates of exchange. Please, be aware that prices in other currencies (USD, PLN) are rate-dependent and fluctuate on daily basis as they are automatically converted from EUR using respective rates of exchange applicable at the time of placing the order. The same applies to shipping fees in PLN or USD.
In your Dashboard you can select the currency you want to have the prices displayed in and be charged (out of the available ones). The Invoice will be issued in your currency of choice at the time of placing the order. Please, not that you can’t select the currency on the Checkout page; you have to do it in your Dashboard.
We reserve the right to modify prices without prior notice. Valid prices are those which are visible and applicable at the time of placing your order.
We offer an option of purchasing digital files intended exclusively for self-printing .
Digital photo files immiediately available for download allow to obtain highest quality prints at the size of 45×30 cm at 300 dpi.
Please, refer to the Terms of Service and Image Use & Copyright Policy as the use of these files is very restrictive. You are not allowed to share these files or re-sale prints. They are excusively intended for your personal use.
We do recommend selecting high-end quality Fine Art papers only.
We reserve the right to discontinue the sale of digital files at any moment and modify their prices without prior notice.
Pricing and Tax Information:
The prices listed on this website are exclusive of taxes; they are net prices. Buyers are responsible for paying any duties, taxes, or customs fees that may be applicable in their respective countries. We cannot be held responsible for any delays or additional charges resulting from customs clearance procedures.
Value Added Tax (VAT) Details:
As a registered business within the European Union (EU), we are legally obliged to levy Value Added Tax (VAT) on both the product (print) and shipping costs. This VAT is not an additional profit for us; it must be remitted to the respective tax authorities in my country. The VAT rate applied varies based on the shipment destination/country and the buyer’s status as an individual or a company.
VAT Breakdown for Buyers:
All relevant VAT rates that are required to be charged are automatically calculated on the Checkout page. This ensures visibility of the total amount due before proceeding with payment.
Once an order is placed and payment is cleared, an invoice containing the base price, shipping fee, and VAT (if applicable) is automatically generated and sent to the provided email address.
We ship prints to more than 50 countries worldwide. If your country is not included, please Contact us.
Your photo is checked by hand, given a protective cover, placed in art-secure packaging and shipped directly from the print lab in Germany to your door. The delivery takes approximately from 9 (most European countries) to 13 (outside Europe) business days depending on the destination country.
Smaller prints up to 60 cm (long edge) are shipped flat in protective envelopes. Bigger prints are shipped in protective rolls.
Shipment fees depend on the size of prints: the bigger the print the higher the shipping fee. There are 4 shipping fee categories: prints up to 60 cm, up to 100 cm, up to 125 cm and up to 180 cm. Please, bear in mind that the external long edge (including selected white borders) decides which shipping category your print falls into.
The applicable shipping fee is automatically calculated on the Checkout page, including the applicable VAT rate (shipping fees are taxable).
Please, bear in mind that shipping fees in other curriencies than EUR are subject to daily exchange rates and they differ slightly from day to day. The valid shipping fees are those displayed on the Checkout page at the time of placing the order once the shipping address has been entered.
We reserve the right to modify shipment fees without prior notice.
We can’t be held responsible for any delays caused by import/customs procedures in your country or delivery issues caused by an incorectly provided delivery address.
Dimensions
30 x 20 cm
12 x 8 in
From
€32
Unframed
Standard price
excl. tax & delivery
Best in-class FineArt papers
Selectable white borders
B&W conversion upon request
Have a question or a request? Contact us.
Shipping to over 50 countries worldwide
Dimensions
45 x 30 cm
18 x 12 in
From
€42
Unframed
Standard price
excl. tax & delivery
Best in-class FineArt papers
Selectable white borders
B&W conversion upon request
Have a question or a request? Contact us.
Shipping to over 50 countries worldwide
Dimensions
60 x 40 cm
24 x 16 in
From
€59
Unframed
Standard price
excl. tax & delivery
Best in-class FineArt papers
Selectable white borders
B&W conversion upon request
Have a question or a request? Contact us.
Shipping to over 50 countries worldwide
Dimensions
75 x 50 cm
30 x 20 in
From
€84
Unframed
Standard price
excl. tax & delivery
Best in-class FineArt papers
Selectable white borders
B&W conversion upon request
Have a question or a request? Contact us.
Shipping to over 50 countries worldwide
Dimensions
90 x 60 cm
35 x 24 in
From
€116
Unframed
Standard price
excl. tax & delivery
Best in-class FineArt papers
Selectable white borders
B&W conversion upon request
Have a question or a request? Contact us.
Shipping to over 50 countries worldwide
Dimensions
105 x 70 cm
41 x 28 in
From
€158
Unframed
Standard price
excl. tax & delivery
Best in-class FineArt papers
Selectable white borders
B&W conversion upon request
Have a question or a request? Contact us.
Shipping to over 50 countries worldwide
Dimensions
120 x 80 cm
47 x 32 in
From
€203
Unframed
Standard price
excl. tax & delivery
Best in-class FineArt papers
Selectable white borders
B&W conversion upon request
Have a question or a request? Contact us.
Shipping to over 50 countries worldwide
Dimensions
135 x 90 cm
53 x 35 in
From
€276
Unframed
Standard price
excl. tax & delivery
Best in-class FineArt papers
Selectable white borders
B&W conversion upon request
Have a question or a request? Contact us.
Shipping to over 50 countries worldwide
Dimensions
150 x 100 cm
59 x 39 in
From
€318
Unframed
Standard price
excl. tax & delivery
Best in-class FineArt papers
Selectable white borders
B&W conversion upon request
Have a question or a request? Contact us.
Shipping to over 50 countries worldwide
Resolution
5400x3600 px
300 dpi
Price
€59
Format: jpg
Bit depth: 8 bit
Color space: sRGB
File intended for printing at your local photo lab
High quality print at the min. size of
45 x 30 cm at 300 dpi
B&W conversion upon request
Have a question or a request? Contact us.
High quality print at the min. size of 45×30 cm at 300 dpi
B&W conversion upon request
Have a question or a request? Contact us.
Immediate download link sent by email
The above prices are approximate and shown only to give you some preliminary idea about the price level. The actual price is displayed on the Checkout page after applying respective exchange rates, shipping costs and VAT, if applicable.
To use the tool, you don’t need to read the following information/instructions. You can just launch the tool wherever you see it available on this website and follow the on-screen prompts. If you, however, would like to know how the tool works before-hand and how to get the most of it, I recommend reading the following information. Anyway, you can always come back to this page if it turns out you need some help or additional information.
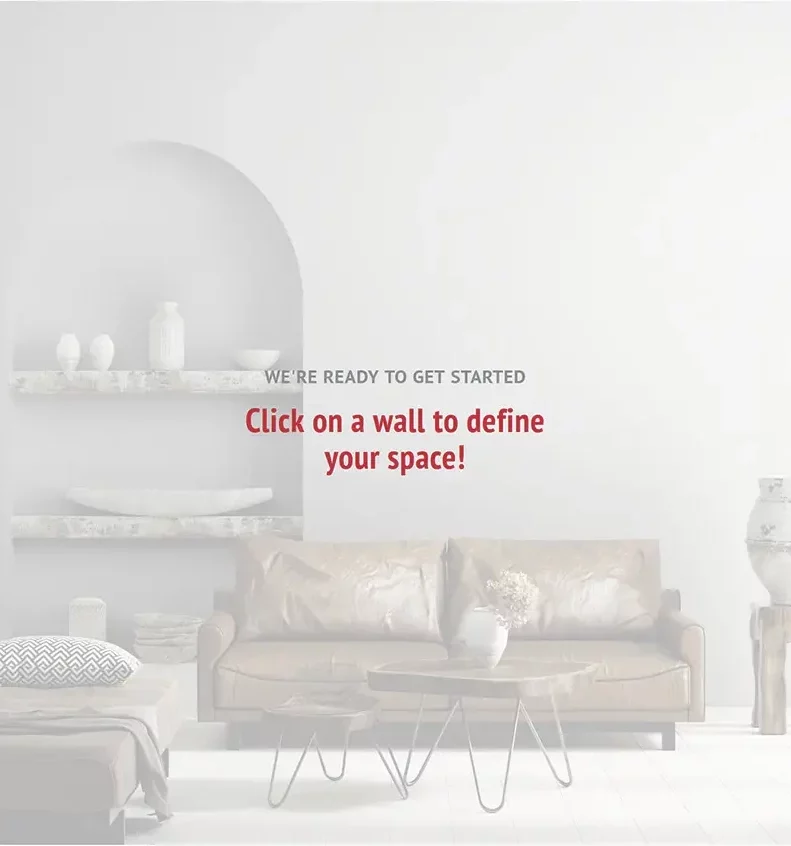
This feature allows you to view the selected photo on your wall and is intended to help you make up your mind which photo will match your interior, combine with your furniture and room colors, in what size and give you some idea about framing style you may like.
The VIEW PHOTO IN YOUR ROOM tool is accessible from each Product page.
Although you can use this tool on your mobile device, due to a much better viewing experience, we highly recommend using it on your desktop/laptop.
If you click on Help in the top right-hand corner of the screen, you will display a visual demonstration how to mark the area on your wall within which you will position and visualize your photo.
Please, note that the visual demontration (Help) can’t be launched from the slideshow level.
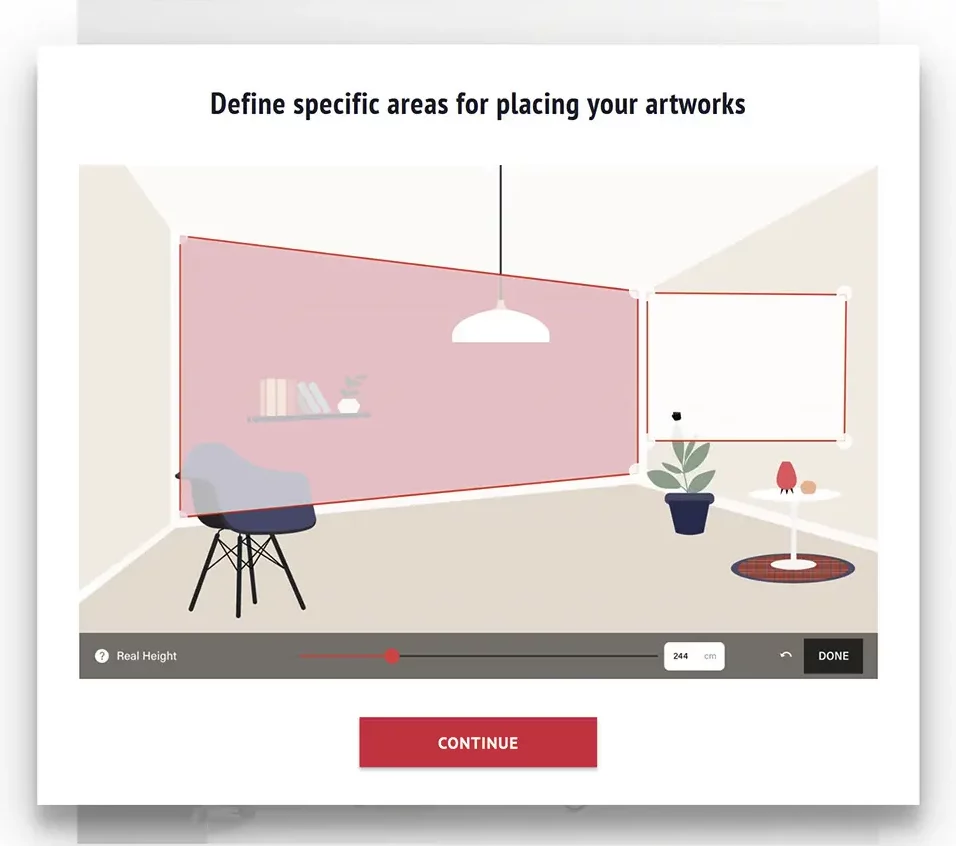
When watching the tutorial, please notice that if the walls in your uploaded room picture are shown in perspective, you have to mark the area accordingly.
Click the CONTINUE button to proceed.
You will see a white rectangular area superimposed over your wall.
This is the area within which you will be able to virtually hang your photo.
You need to adjust the size of that white area.
Hint: We recommend marking a much bigger area than the photo itself as it will give you more flexibility with positioning and sizing of your photo or will allow you to place more photos side by side.
Hint: Your photo will always be positioned parallel to the sides of the white area. If you don’t have walls in perspective, don’t move the bigger corner/round handles.
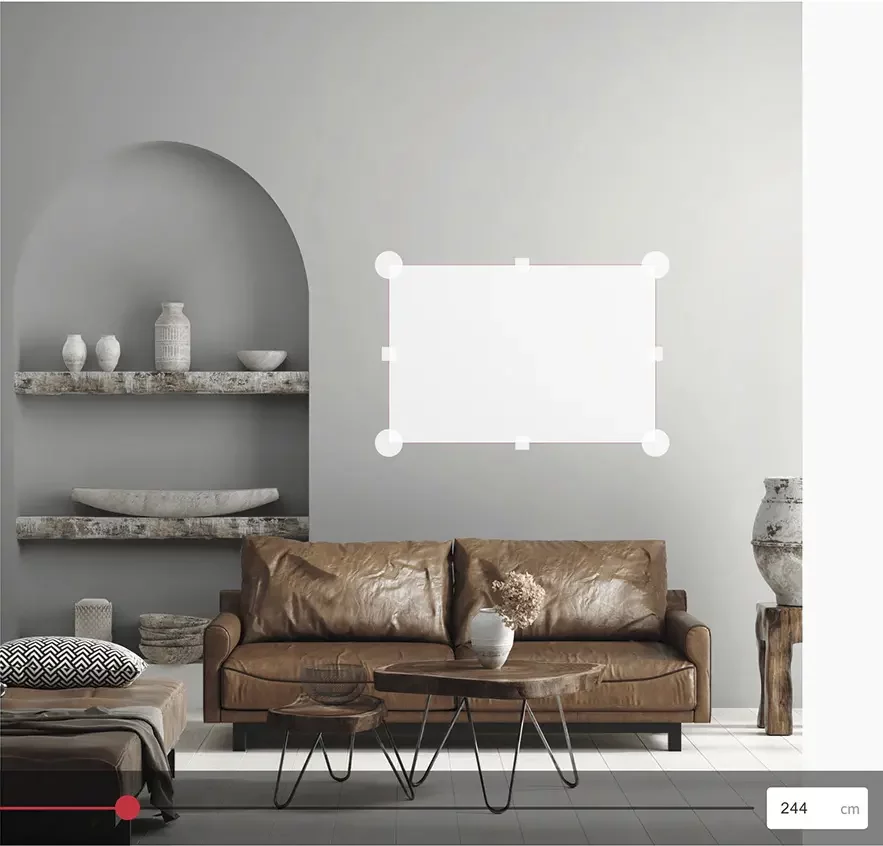
You can click on the white area and reposition it on the wall.
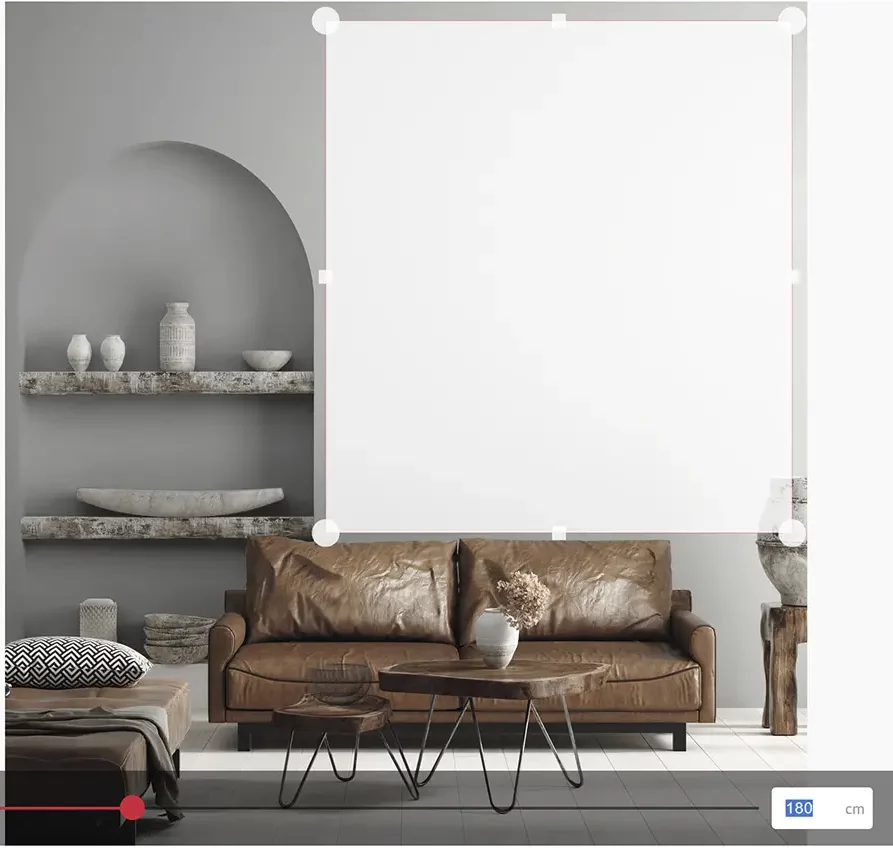
Enter the real height of the area you have adjusted (not of the wall) in cm or drag the slider at the bottom of the screen until you get the correct height.
Please, note that the more accurately you provide the height, the more accurately the photo will be displayed in scale relative to the real dimensions of your interior.
Click the red DONE button.
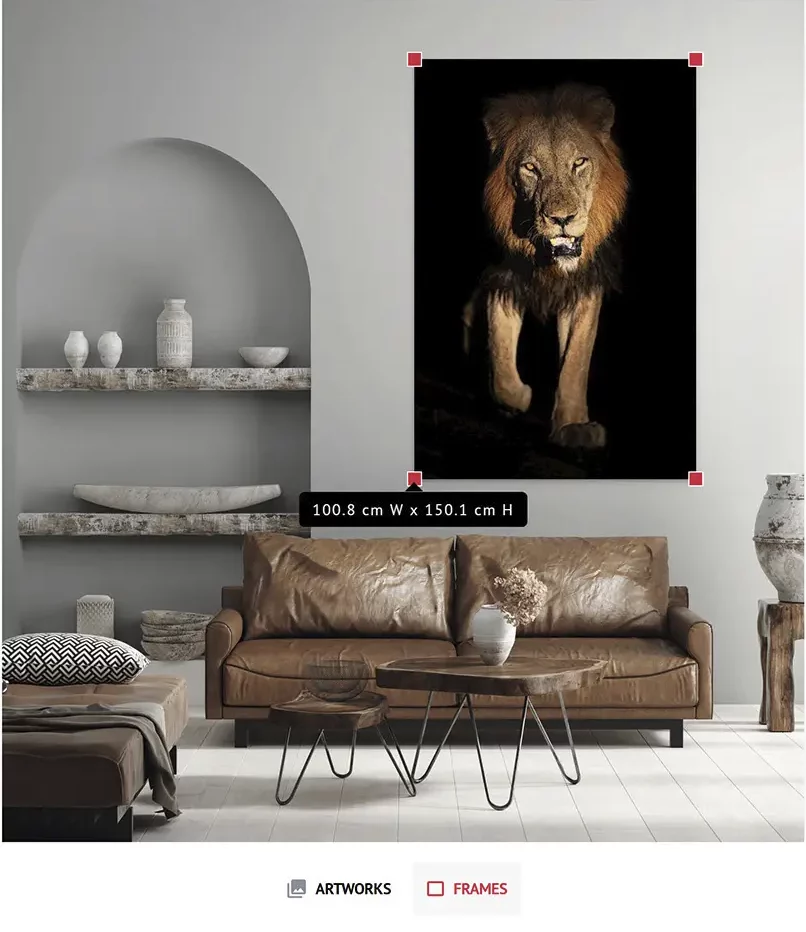
Drag the red corners to adjust the size of the photo.
Hint: If you first hover the mouse cursor over one of the red handles until the photo size is displayed and then start dragging the handle, you will see the changing dimensions while resizing the photo.
When adjusting the size, please bear in mind the standard sizes in which a given photo is available. You can display the adjusted photo size by hovering the mouse cursor over one of the red handles.
You can reposition the photo on you wall within the area you have marked previously.
If you hover the mouse cursor over the red handle, you will see the size of the photo in scale.
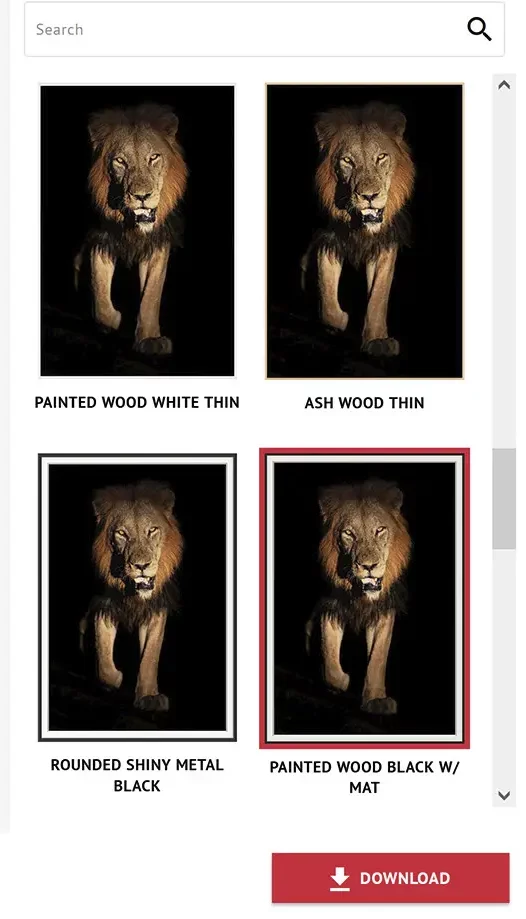
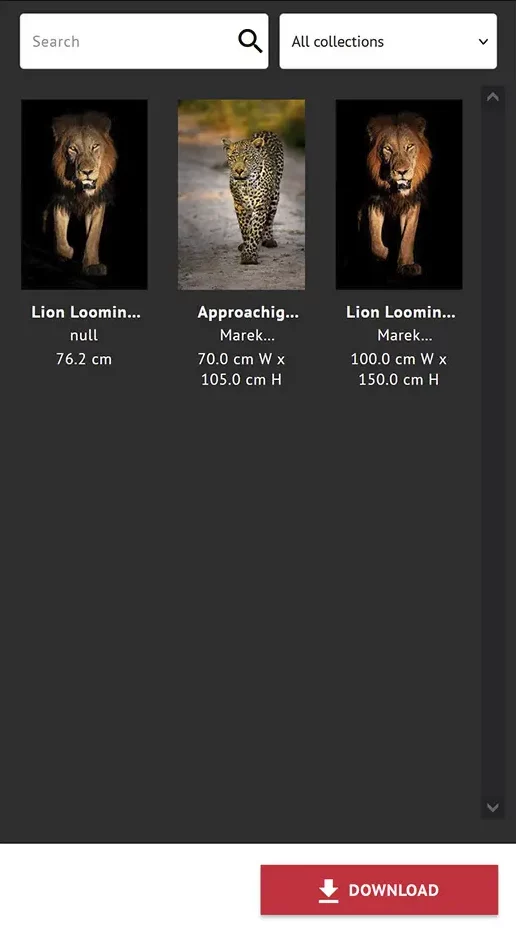
Click the ARTWORK button at the bottom of the screen to display the window with other photos. Click it again to close it.
If you want to change the photo, click the current photo (you will see the red handles) and the Delete key on your keyboard to make room for a different photo or drag the current photo out of the wall area.
You can search photos by name typing it in the Search box and/or select photos from different galleries using a drop-down list.
Hint: Artworks are simply the photos you can also see on the Galleries and Shop pages and in the Virtual Exhibitions. They are categorized into galleries in the exactly same way.
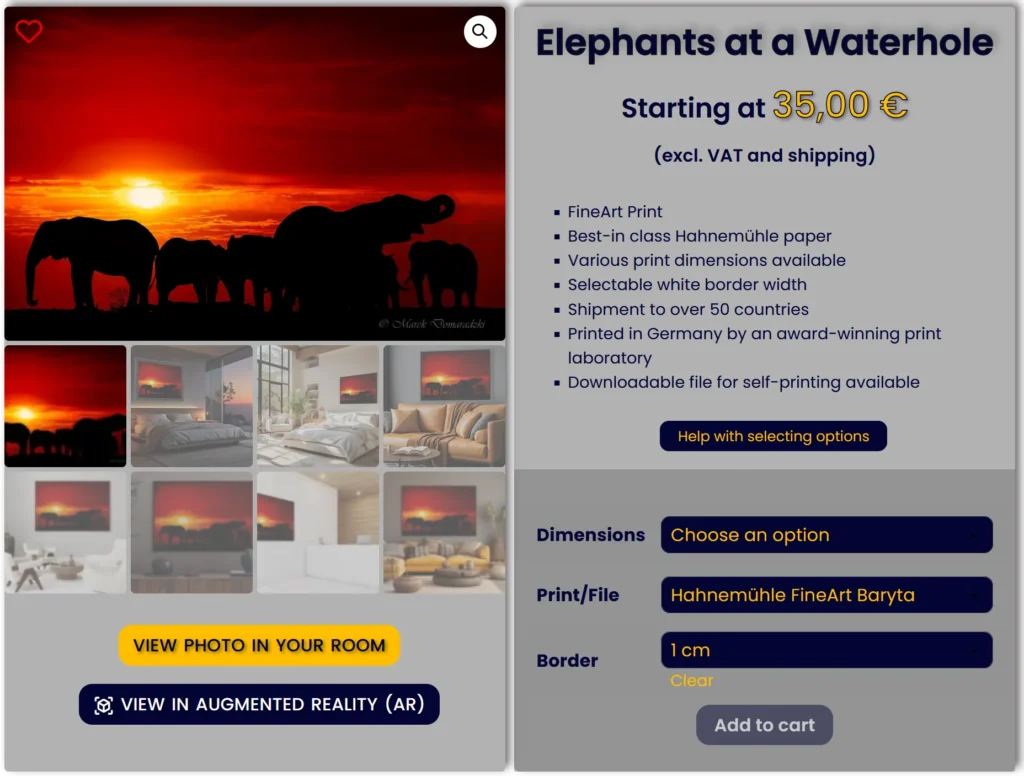
You need to select an option for each field (Dimensions, Print/File and Borders) to display the price and make the Add to Cart button active.
If you want to select a PRINT:
Once the options have been selected as intructed above, you will see the external dimensions of the print including the selected wide borders, the net price (excluding VAT and shipping) and you will be able to add the print to the cart.
NOTE: You also need to have all the options selected and the price displayed to view the photo in the selected size in Augmented Reality (AR). If options are not selected, the size of the print displayed in Augmented Reality (AR) will be 150×100 cm, which may not be the size you want.
If you want to select a FILE:
Once the options have been selected as intructed above, you will see the net price (excluding VAT) and you will be able to add the file to the cart.
If you get a message Sorry, no products matched your selection. Please choose a different combination., it means that you either haven’t selected the options as instructed above or the selected photo is not available in the selected dimensions.
Should you need more information, please see Prints or Contact us.
This is the second tool available on this website allowing you to view the selected photo on your wall and is intended to help you see how the selected photo will match your interior, combine with your furniture and room colors.
VIEW IN AUGMENTED REALITY (AR) – available on product pages – allows you to superimpose the selected photo on your wall, in scale, in real time through your mobile device camera.
We noticed you're visiting from Poland. We've updated our prices to Polish złoty for your shopping convenience. Use Euro instead. Dismiss

