Here you’ll find answers to the most common questions about my work, prints, and ordering. Use the search bar or click a category button to explore the topics. If you need more help, feel free to Contact me. I’m always glad to assist!
I’ve been a Nikon shooter since the film days. Currently, I work with two Nikon Z9 bodies and a collection of native Z lenses. This system meets all my needs, and when something goes wrong, it’s usually my own error rather than the equipment. If Nikon ever falls short in lenses, bodies, or accessories for specific tasks, I might consider adding another system. But I’m not planning to “jump ship” — especially since Nikon now offers one of the best lens lineups for wildlife photography. At the end of the day, the gear is just a tool to get the job done.
I use only Nikon’s native Z-mount glass. My favorite lens by far is the NIKKOR Z 400mm f/2.8 TC VR S. Its built-in 1.4× teleconverter instantly extends the reach to 560mm f/4 with a flick of a switch. This two-in-one lens represents the pinnacle of image quality and performance, especially when paired with a high-resolution Nikon Z9.
Since I’m not primarily a birder, I don’t need more reach than this. The fast f/2.8 aperture is critical in low light, letting me freeze motion without pushing ISO too far. Sometimes the lens is too long when I’m close to animals, which is why I also keep the NIKKOR Z 70–200mm f/2.8 VR S mounted on my second Z9, ready to grab.
For wider perspectives I use the NIKKOR Z 14–24mm f/2.8 S and the NIKKOR Z 24–120mm f/4 S, mostly for close-range ground-level shots or scenery.
I also carry the NIKKOR Z 28–135mm f/4 PZ, which is primarily designed for professional cinematographers. Although I’m not a filmmaker, the power zoom feature lets me zoom in and out remotely — useful when I can’t reach the zoom ring or when I need to remain completely still in front of an animal.
Recently, I’ve added the NIKKOR Z 85mm f/1.2 S, which produces stunning background rendition. It’s ideal for night wildlife photography if I can get close enough — and it’s one of the sharpest lenses ever produced by any brand.
No. Spending hours or days in a hide, waiting for animals to come into the frame — often in staged settings — is not my style of shooting. I prefer to track animals in their natural environment and get as close as possible, always with safety in mind. For me, the challenge of locating and approaching animals is an essential part of the experience.

I rarely use tripods except when shooting long exposures. I typically shoot handheld, primarily from open vehicles or boats and, if possible, from eye/ground level. There are moments when you need to immediately adjust the lens position to ensure a clear shot unobstructed by grasses or branches or when you need to lean out of the vehicle or lower the lens to match the animal’s eye level. When shooting from a vehicle, tripods are unwieldy and restrict quick lens repositioning.
Instead, I rely on fast shutter speeds to freeze motion and modern lens and in-camera stabilization, when I need to drop shutter speeds due to low light conditions when subjects are relatively still. Occasionally, I use bean bags on the car door or floor, just to provide a soft support for the lens.
Most of the time, I use fast shutter speeds to freeze the motion of the animal. When the subject is relatively still, or when low light forces me to lower the shutter speed, I rely on lens and in-camera stabilization, which work extremely well. Occasionally, I use bean bags on the car door or floor, just to provide a soft support for the lens.

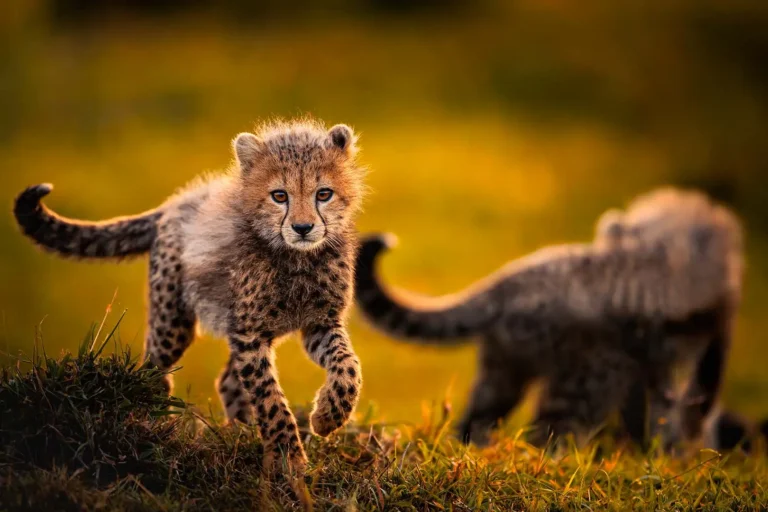
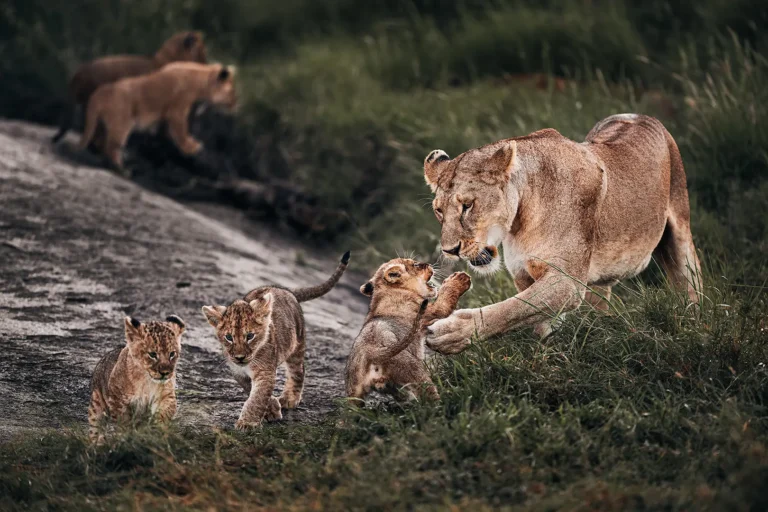
No. Every photo on this website shows wild animals in their natural habitat — roaming freely, hunting, fighting, or in flight. Occasionally I encounter collared animals (for GPS monitoring) or de-horned rhinos (to protect them from poaching), but I choose not to photograph them. For me, those images would not represent true wilderness.
No — I don’t use AI to alter scenes, composite elements, or generate images that never existed. You don’t spend big money on gear and trips just to produce AI-generated pictures.
That said, many modern editing tools use AI for technical steps such as selections, masking, or noise reduction. These features speed up the workflow — and often outperform older tools — but they don’t change the authenticity of the photo.
The only times I may combine frames are for technical reasons: panoramic stitching when a subject doesn’t fit in one shot, or blending two exposures in extreme contrast situations (one exposed for highlights, the other for shadows). These techniques only work with stationary subjects or landscapes, not moving wildlife. I also avoid the typical HDR look.
I shoot exclusively in RAW to capture the maximum data from the sensor, and I process the files myself — never relying on in-camera processing with baked-in edits.
Although the Z9 and my lenses are fully capable of professional video – even in 8K – I only film occasionally. My main focus is always still photography; you can’t truly do both at the same time. If a scene doesn’t work as a photo, I may capture a short video clip instead.
On upcoming trips I plan to add a small video camera mounted on my cage to record video alongside my stills. You can already see a few clips on the home page, and I’ll soon be adding a behind-the-scenes section with more videos from the field. If you’d like to know when new clips go online, the easiest way is to subscribe to my newsletter or revisit the site from time to time.
Occasionally — but only in very specific situations. In daylight I may add a touch of fill flash to lift shadows or bring out fur detail. At dawn or dusk I sometimes expose for the colors of the background and use just a hint of flash to balance the subject.
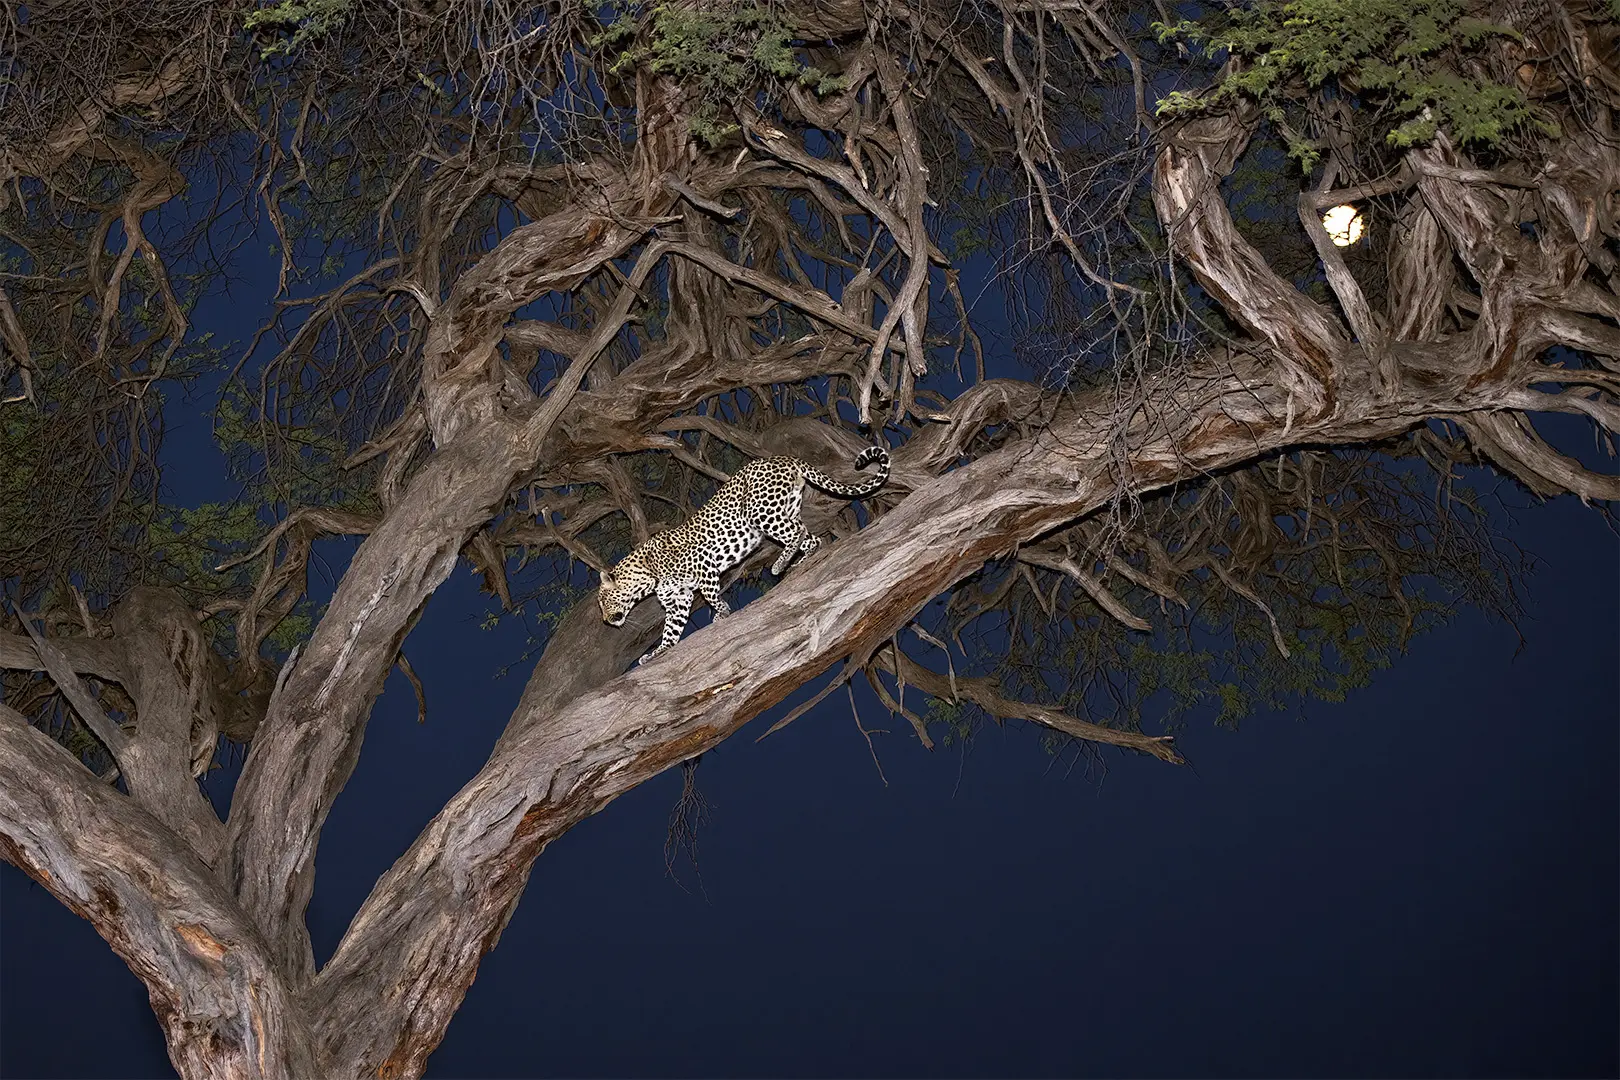
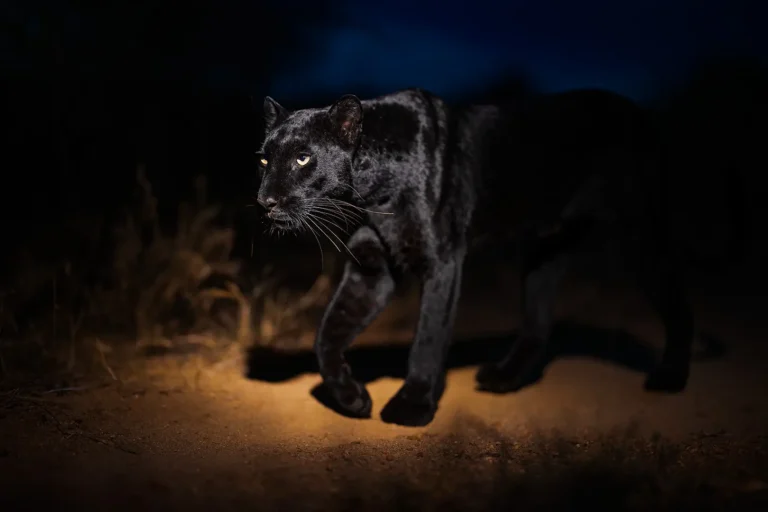
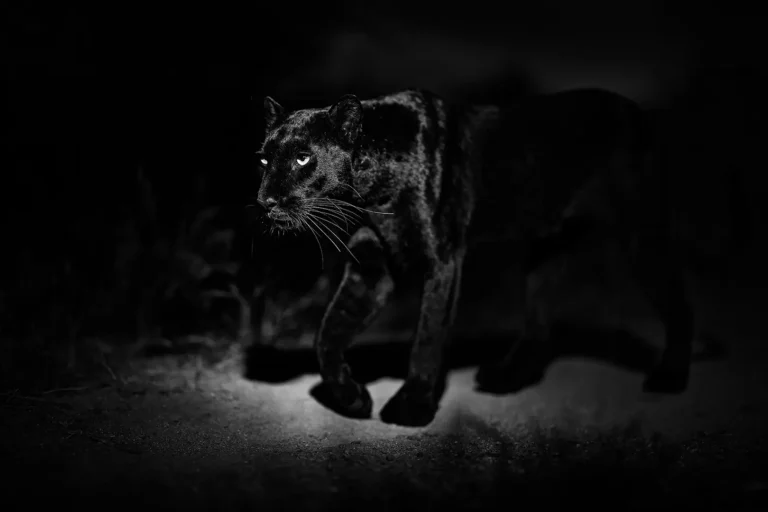
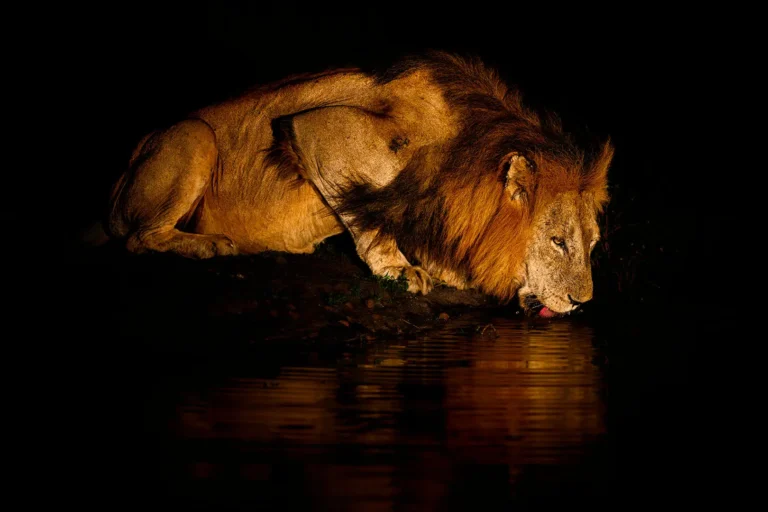
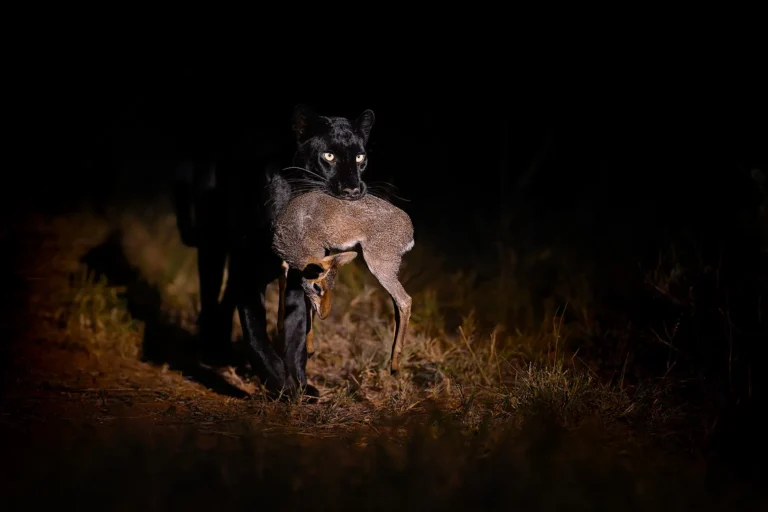
I never use flash at night. When it’s pitch dark, there’s nothing meaningful to illuminate — and flash would only destroy the natural atmosphere. All of my night photos are taken without flash, relying instead on the soft spotlight used by the driver.
Most importantly, I never use flash if it could harm the animals — especially species with sensitive eyes or young cubs. Animal safety always comes first.
Sometimes extremely close — even just 2–3 meters. How close we can get is never my decision alone; it’s the ranger who knows the animals’ behavior, personalities, and temperaments, and who decides what’s safe. Their knowledge is what makes such encounters possible without disturbing the animals’ natural behavior.
Still, wildlife can be unpredictable. Once, a male lion walked right past me while I was focused on photographing a lioness carrying her cub. On another occasion, during a bush walk, a female elephant with two young calves suddenly appeared so silently that nobody realized she was nearby. Situations like this can unfold in seconds. When they do, the rule is simple: stay calm, don’t move, don’t panic. The only way to stay safe is to show no threat to the animal.
On desktop, when you open a photo in the Lightbox, the title, description, and filmstrip appear by default. On portrait photos, this can cover part of the image. On mobile, the filmstrip is hidden by default.
Definitely not. All the photos on my website have been heavily downsized for both website optimization and protection. Downsizing, converting to 8-bit sRGB, and exporting to WebP inevitably reduce image quality. In some cases you may notice halos or posterization, which don’t appear in master files.
As an example, the color photo of the black jaguar (“Emerging Ghost”) used in the homepage slider looks decently sharp even on my 4K screen, yet it’s only about 50 kB. The master file I use for 150×100 cm prints is in ProPhoto RGB (a color gamut wider than the human eye can see), 16-bit depth, and exceeds 1 GB. That’s how much resolution, color and tonal data is stripped away for web use.
The same images appear in the Gallery, the Shop, and the Virtual Exhibition, but each serves a distinct purpose. The Gallery is for browsing, the Shop is for purchasing (with the option to zoom in and see room mockups), and the Virtual Exhibition offers an exhibition-style experience, presenting the photographs in a curated environment comparable to a real gallery show. It also extends the reach of my work to a wider audience through ArtPlacer and its mobile app.
In addition, the moving thumbnail slider at the bottom of the page lets you jump straight to a chosen photo in the Gallery.
If you want the largest online view of a specific print, the Shop page with its magnifying tool is the best place.

The Virtual Exhibition is an interactive 3D gallery where you can experience my photos much like walking through a real exhibition. You can navigate with the on-screen arrows or open the menu to jump directly to a specific artwork.
Clicking on a photo or the Learn More button opens a popup with the story behind the image, the price for the largest size (150×100 cm), and direct links to the product page (Buy) or to the main Shop (View More). From there you can choose other sizes, browse by categories and tags, and view room visualizations.
The Virtual Exhibition also supports Augmented Reality (AR). On desktop you can scan a QR code to display the photo on your mobile device, or on the product page you can use the View in Your Room option to superimpose the artwork onto a photo of your own wall — adjusting dimensions and trying different framing styles in real time.
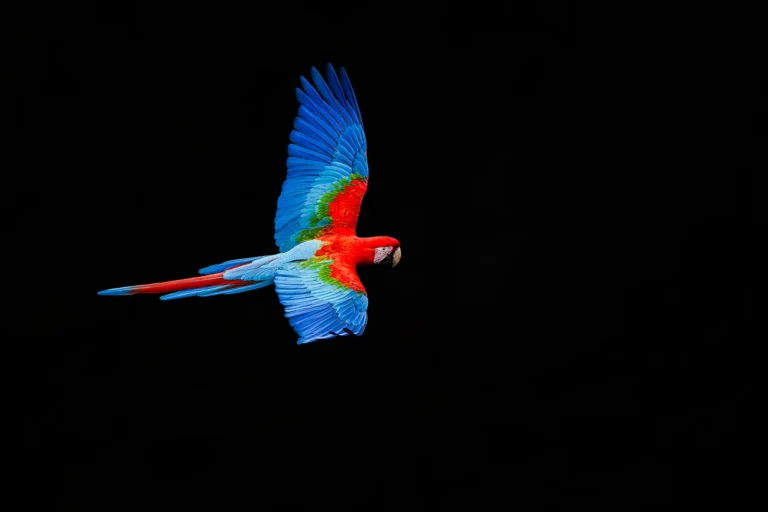
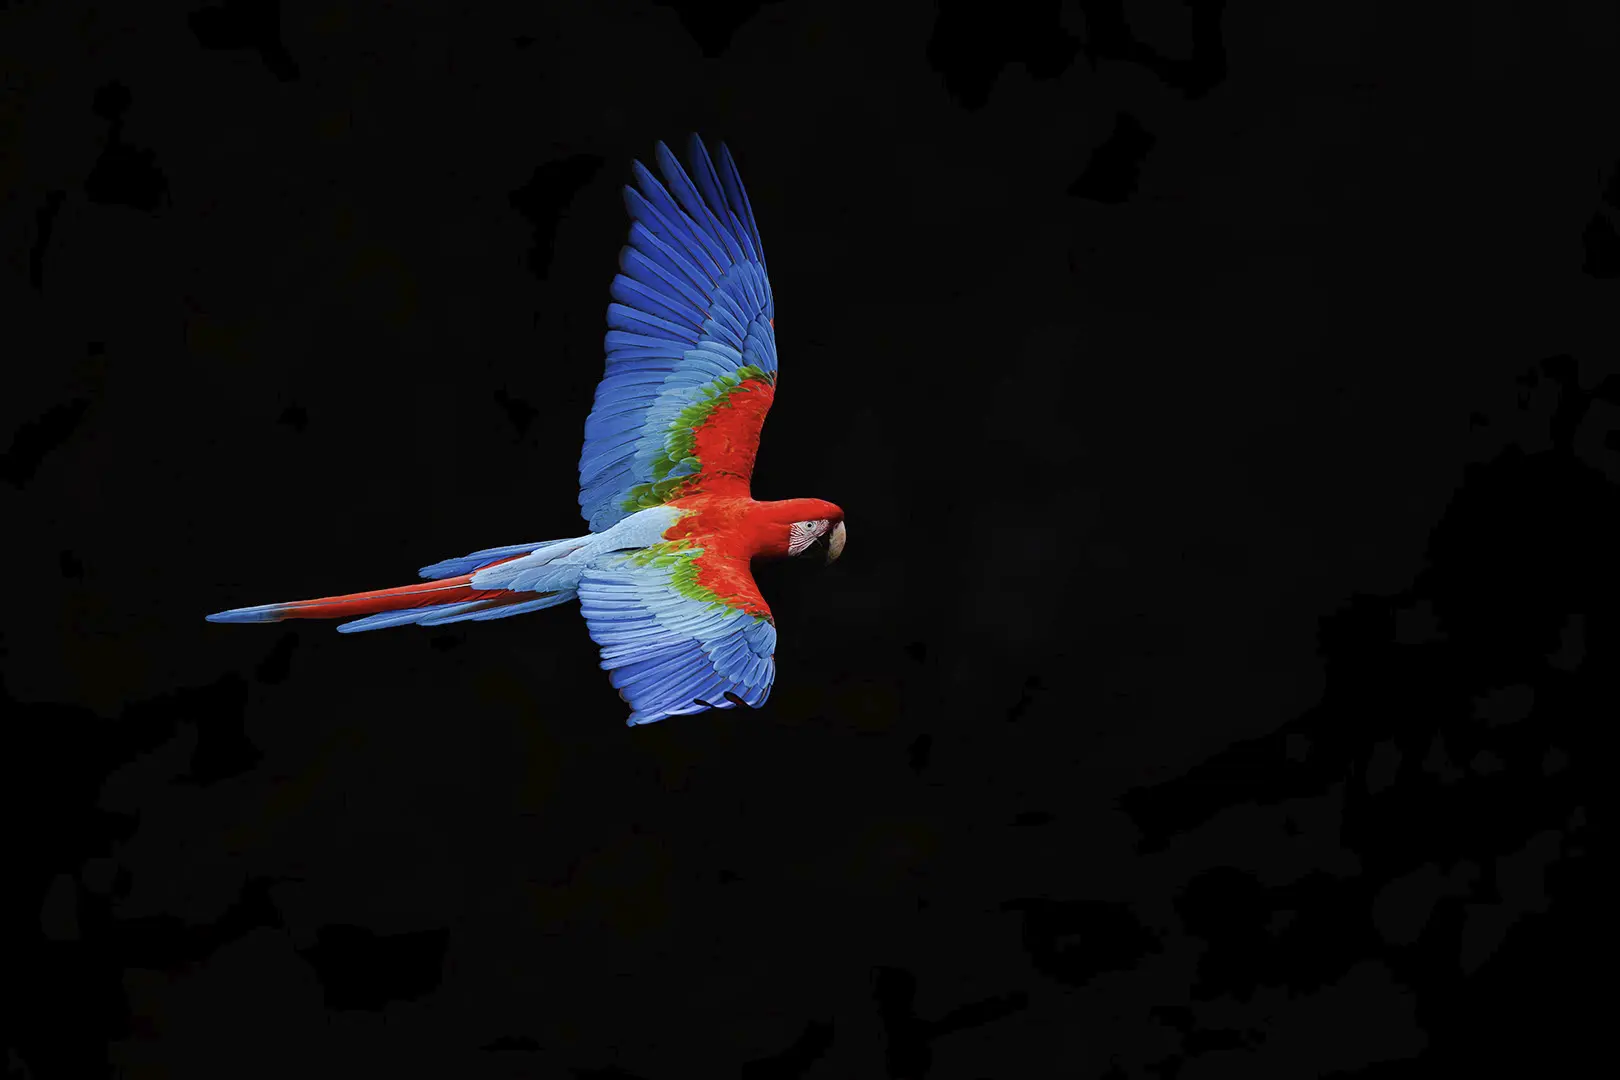
Low-key photos are those where very dark tones prevail and the main bright subject stands out from a very dark background. In wildlife photography, you can obtain this effect in very specific and quite unique lighting situations. For instance when you have your subject sidelit or backlit, either by a spotlight or natural light, and you turn down exposure so as not to overexpose the brightest light falling onto your subject. The photo on the left is a good example of a low-key technique when I took advantage of the natural light and the macaw’s position against the dark background. The macaw was lit by a very bright sun from the opposite side and was flying against a very dark wall of the sinkhole, which was in deep shade. If I had used an automatic exposure, the camera meter would have been fooled by the overall dark tones of the wall and would bump up exposure to give me the “correct” exposure for the dark wall as it was occupying the greatest majority of the frame. Then, the end result would be a photo of the correctly exposed wall with some overexposed blob instead of the red macaw. Exposing correctly for the macaw and heavily underexposing the background at the same time gave me the effect I was after. Yes, this photo was taken in bright sunlight. The opposite of low-key photos are high-key ones.

Printing is an art in itself, so I leave it to the best. All my prints are produced by WhiteWall in Germany, one of the world’s leading fine-art photo labs.
WhiteWall has been awarded multiple TIPA World Awards as “Best Photo Lab Worldwide” (2013, 2017, 2020, 2021, twice in 2023, and again in 2024 and 2025) and is trusted by over 20,000 professional photographers, artists, and galleries worldwide. They are also the exclusive printing partner for LUMAS galleries and collaborate with brands like Leica.
Every print is made with museum-grade standards, using carefully selected materials, precise color management, and rigorous quality checks. This guarantees that my work is reproduced with the highest fidelity, durability, and consistency — ready for display in private collections or galleries around the world.
I generally retain the original aspect ratio of a full-frame camera sensor (2:3 / 3:2). Most prints are available in sizes up to 150 cm on the long edge — for example, 100×150 cm or 150×100 cm.
If a particular photo doesn’t have sufficient resolution for the largest format, I only offer sizes that ensure top print quality. Because maximum sizes vary from photo to photo, the best way to check availability is to open the product page in the Shop and view the size options in the Dimensions drop-down menu.

All my photographs are composed and printed in their original 2:3 / 3:2 aspect ratio — the natural proportions of a full-frame camera sensor. This preserves the intended framing and ensures no important detail is lost through cropping.
While most prints are offered only in this format, some images can also look excellent in panoramic or 1:1 (square) layouts. If you have a particular format in mind, please contact me before placing your order. I’ll review whether the photo can be prepared in that aspect ratio without compromising composition or quality.
Framing is an art in itself, and professional framing can really make a print stand out. Today, the options are almost limitless — with different materials, finishes, and styles to suit personal taste, interiors, and budgets. Professional framing is also expensive and adds significantly to shipping fees. For many clients, it’s often simpler and more economical to order a print and have it framed locally.
To cover all framing possibilities online, I would need a fully integrated configurator linked to WhiteWall, which isn’t technically possible at the moment. (See also the Downloads FAQ, which explains how digital files can be combined with WhiteWall’s configurator to achieve a framing of your choice.)
However, if you would like a framed print, you can use WhiteWall’s configurator to select the frame you like. I will then prepare a personalized quote for you to review before placing the order.
I use Hahnemühle FineArt Baryta because it combines the qualities valued most in wildlife photography: exceptional depth, sharpness, and tonal range. Its very high Dmax allows for deep, rich blacks, which is crucial for dramatic low-key images. The paper’s baryta coating — a layer of barium sulfate originally used in traditional darkroom papers — prevents ink from sinking into the fibers. This keeps the pigments near the surface, resulting in sharper detail, brilliant colors, and deep contrast with a classic photographic look.
Another reason I chose it is its versatility: FineArt Baryta is equally well-suited for both color and black-and-white printing. Many labs offer different papers for each, which can be overwhelming for non-specialists. By focusing on this one outstanding paper, I can ensure consistently excellent results across my portfolio without asking buyers to make technical choices.
The bright white base also makes colors and highlights stand out. This whiteness comes from optical brightening agents (OBAs), which some may criticize in the context of long-term archiving. In practice, however, FineArt Baryta is acid-free, lignin-free, and meets international archival standards — it has been trusted by museums and galleries worldwide for exhibition prints.
In short, I chose it because it offers the best balance between brilliance, detail, versatility, and archival stability for large-format wildlife prints.
There is no single “ideal” paper — photographers often have their own preferences and favorite papers. One of the most important factors in choosing the right paper is the type of photography.
My images are full of fine details, cover a wide tonal and color range, and often contain very deep blacks. Many are photographed at golden hour, when the light is warm, vibrant, and saturated. Matte papers, by their very nature, cannot reproduce this range as effectively: blacks appear softer, contrast is reduced, colors lose vibrancy, and fine details are less sharply rendered. What you see on a backlit screen simply cannot be matched on matte paper for high-contrast, detail-rich wildlife photography.
Matte papers can work beautifully for images with a softer tonal balance or lower contrast, but they fall short for dramatic wildlife scenes. If you compared the same photo on matte and on FineArt Baryta side by side, the difference would be obvious.
The fine art paper I use has a subtle, elegant sheen that enhances depth, detail, and sharpness without being overly reflective — not the harsh, mirror-like gloss you might associate with consumer photo papers.
For a direct comparison, I recommend this video review: Photo Printing Hahnemühle FineArt Baryta & Photo Rag: Gloss vs Matte Printing of Photography.
You can always contact us when in doubt.
Not at all. Different papers have different base shades of white — some are slightly cooler, some warmer, and some appear “whiter.”
It’s important to remember that the white you see in a print is simply the natural white of the paper itself, since no ink or pigment is applied there. This makes paper choice critical: for example, if you print a high-key photo (with a pure white background) on a warmer paper, the image can appear aged or yellowed, even though that’s just the natural tint of the paper.
That’s one of the reasons I use Hahnemühle FineArt Baryta. Its bright base delivers clean, neutral whites, enhanced by optical brightening agents (OBAs). While some papers without OBAs look more subdued, FineArt Baryta provides the clear, luminous whites I need for both color and black-and-white photography.
FineArt prints are produced on museum-grade papers designed specifically for professional photography and art. These papers are acid-free and lignin-free, which means they won’t yellow or degrade over time — they are made to last for decades under proper conditions. Standard commercial papers, by contrast, are cheaper, often contain acids, and are not archival. They may fade or lose their original look after only a few years.
Another key difference is in color and detail. FineArt papers such as Hahnemühle FineArt Baryta can reproduce an exceptionally wide color range with very deep blacks (high Dmax) and smooth tonal transitions. They also hold the pigments on the surface of the paper, which results in sharper detail and finer textures. Cheaper commercial papers can’t match this: colors look flatter, blacks are weaker, and details often appear softer.
The look and feel are also different. FineArt papers have a refined surface and subtle sheen that gives a professional, gallery-quality appearance. Standard lab papers, in comparison, are designed for everyday consumer use and often have a shiny, plastic-like gloss.
In short, FineArt prints are more expensive because the paper itself is part of the artwork. It ensures archival longevity, superior sharpness, and a finish worthy of being displayed in galleries or private collections — something ordinary photo papers simply cannot provide. That’s why all of my work is printed exclusively on FineArt paper, to guarantee the best possible quality for collectors and enthusiasts alike.
All my prints are produced on Hahnemühle FineArt Baryta, a museum-grade paper designed for archival longevity. Under proper display conditions, prints made on this paper with pigment inks can last for many decades — typically well over 60 years on display.
Like most bright white papers, FineArt Baryta contains optical brightening agents (OBAs), which give the paper its clean, luminous base. Over a very long period, OBAs may gradually lose some of their effect, but this does not compromise the overall durability of the print. The archival standards of this paper are recognized by museums and galleries worldwide.
Not exactly. What you see on a backlit screen will never match a paper print perfectly, because they are two very different media. Screens emit light, while prints rely on reflected light from the paper surface. This makes prints naturally less bright than what you see on your monitor or mobile device.
Another factor is calibration. On a properly calibrated monitor, colors and tones will be much closer to the final print. But if your screen is too bright or too dark, or if you use features like night mode or eye-protection filters, what you see will differ from the actual print. Different browsers can also render the same image with noticeable variations — for example, Firefox may oversaturate colors while Edge displays them more faithfully.
On my end, every image is carefully prepared. I work in wide-gamut color spaces, then soft-proof and optimize the files for Hahnemühle FineArt Baryta and the printers used by WhiteWall. This ensures that the final print reproduces the intended tones and colors as accurately as possible within the natural limits of paper.
The way a print looks also depends on viewing conditions. A print displayed in a well-lit room with natural or gallery-style lighting will reveal much more depth, color, and contrast than one viewed in dim light.
No — different photographic papers have different coatings, base tones, and surfaces, all of which influence how colors and tones are reproduced.
High-end fine art papers, such as Hahnemühle FineArt Baryta, can handle an exceptionally wide color gamut and produce very deep blacks (high Dmax). This allows them to render vibrant colors and smooth tonal transitions with accuracy. By contrast, cheaper or matte papers often have a reduced gamut and lower Dmax, meaning certain colors cannot be reproduced and are replaced with the nearest available substitute. Blacks may also look weaker and less defined.
It’s also important to understand that every print file has to be optimized for the specific paper and printer it will be produced on. That is part of my workflow when preparing files for WhiteWall. If you purchase a digital file and print it on inexpensive paper, you will inevitably be disappointed — the result will not match the quality, depth, or fidelity of my official FineArt prints.
No. Purchased prints are delivered clean and free of watermarks. I also do not add a printed signature to the image — the artwork is presented exactly as intended, without any digital branding or overlays.
By default, prints are produced and shipped directly by WhiteWall, which ensures the highest professional quality and fast delivery. Because I don’t handle the prints personally, they are not signed.
For collectors who wish to have a hand-signed print, this can be arranged on request. In such cases, the print must first be delivered to me for signing and then forwarded to you. Please note that this will extend the delivery time and may involve additional shipping costs.

No. Purchased digital downloads are delivered as clean, high-resolution files without any watermark or branding.
However, all images remain protected by copyright. A digital download is licensed strictly for personal use — for example, making a print for your home, office, or private collection. Any unauthorized use, redistribution, or resale is a copyright violation. For information about commercial usage, please see the dedicated question on that topic.
No. While the downloads are high resolution (5400×3600 px, suitable for prints up to 45×30 cm at 300 dpi) and exported from my master files soft-proofed for Hahnemühle FineArt Baryta, they are delivered in 8-bit sRGB JPG format.
If you print them through a professional lab on fine art paper, results can be good. But if you go with a budget lab or cheaper paper, don’t expect the same quality — colors may shift, blacks may look dull, and fine detail may be lost. Simply put: you get what you pay for.
For guaranteed, museum-level results, only my official FineArt prints — made from 16-bit ProPhoto RGB master files on pigment-based printers — deliver the full quality I intend.
See also: What is the purpose of offering digital files for self-printing when I can order a professionally printed photo?
Digital downloads are offered mainly for convenience in specific situations. For example, if you live in a country where shipping is difficult or expensive, you can order the file and have it printed at a local photo lab. You may also prefer to use a lab that offers both printing and framing services in one place. Some clients even upload the file directly to WhiteWall and use their online framing configurator, with WhiteWall handling both production and delivery.
The downloadable files are prepared at 5400 × 3600 pixels and soft-proofed for Hahnemühle FineArt Baryta, just like my official prints. This resolution allows for excellent quality up to about 45 × 30 cm at 300 dpi. Larger prints may require upscaling, which introduces a risk of losing sharpness and fine detail. They are therefore not intended for very large wall art.
It’s important to note that not every paper or lab can reproduce the same wide color range, deep blacks, or sharp detail as FineArt Baryta. If printed on lower-grade papers or consumer printers, results may look flat, dull, or lacking in contrast.
Digital downloads are strictly for personal use. They may not be resold, redistributed, or used for commercial purposes without prior written permission.
In short, digital downloads are offered for flexibility and convenience — not as a replacement for FineArt prints, which remain the only option for large-format, gallery-quality results.
Yes, you can. The resolution of 5400×3600 px allows for a very high-quality print at 45×30 cm (300 dpi). Professional photo labs can upscale this file to produce a larger print, but please note that any enlargement beyond this size is done at your own responsibility.
The digital files I provide are exported from the master file and optimized for Hahnemühle FineArt Baryta, so they are perfectly suited for that paper type. If you decide to print larger, I recommend using a professional lab and high-end FineArt papers (such as Baryta or similar) to preserve color depth, sharpness, and tonal range.
Important: I can only guarantee print quality up to 45×30 cm at 300 dpi, as this is the size the file is prepared for.
They are offered mainly for convenience, especially to give clients flexibility with framing. Once my Shop is integrated with WhiteWall’s framing configurator (or another technical solution is in place), I will most likely withdraw this purchase option completely. I therefore reserve the right to remove digital downloads from the Shop at any time without prior notice.
If you are interested in a digital file, it’s best to secure it while the option is still available.
No. Digital downloads are licensed strictly for personal use only. This means you may print the file for display in your own home or office, including by uploading it to a professional lab of your choice for printing.
You may not:
Share, gift, or resell the file to others.
Upload the file online (including social media, websites, or blogs).
Use the file in advertising, publications, fundraising, or any other commercial project.
Modify, alter, or manipulate the file — including with AI tools — to create derivative works.
Claim authorship or imply the image is your own.
If you want to show others the work, please share a link to my website or Shop rather than distributing the file itself. For commercial or editorial projects, separate licensing is available — please contact me directly to discuss.
Here is the link to Copyright Policy.
No. A FineArt print is a physical artwork licensed for display only in your home or office. Purchasing a print does not transfer copyright or grant any digital or commercial rights.
You may not:
Scan, photograph, or otherwise reproduce the print to create copies.
Upload, share, or distribute a digital version of the print.
Use the image from the print in advertising, publications, or any other commercial project.
Modify the image in any way, including using AI tools to create derivative works.
Here is the link to my Image Use & Copyright Policy.
A FineArt print is more than decoration — it’s a piece of art. The way you display it greatly influences how it looks and how long it lasts.
Light: Place your print in a spot with soft, indirect light. Natural daylight is ideal, but avoid direct sunlight as it can cause fading over time. If you use artificial lighting, neutral LED spotlights or gallery-style picture lights will enhance colors and detail without heat damage.
Space: Prints need room to breathe. Hang them where they won’t be visually crowded by other décor. Neutral wall colors work best to let the artwork shine, but bold walls can also create striking contrasts if chosen carefully.
Viewing distance: Large-format prints are designed to impress at scale. Ideally, allow at least 2–3 meters of viewing distance so the full detail and impact can be appreciated.
Framing & protection: Use UV-protective glass or acrylic when framing to safeguard colors and details. A high-quality frame not only protects but also complements the print.
Environment: Stable temperature and humidity are important. Living rooms, offices, and bedrooms are perfect. Avoid damp areas such as bathrooms or kitchens — unless you use alternative, moisture-resistant substrates (see next FAQ).
With thoughtful placement and care, your FineArt print will retain its brilliance for decades, enriching your space every day.

FineArt Baryta prints are not suitable for humid environments like bathrooms, where moisture can damage the paper over time.
If you’d like to enjoy my work in such spaces, WhiteWall offers excellent alternatives:
HD Metal Prints – extremely durable, waterproof, and scratch-resistant. They deliver high vibrancy and sharpness, even in challenging environments.
Acrylic Prints – sealed under glossy acrylic glass, they combine depth and brilliance with reliable protection against humidity.
Both options provide durability with a striking, contemporary look — perfect for bathrooms or kitchens.
Purchasing a digital download also gives you the flexibility to print on one of these media locally or with WhiteWall, allowing you to choose the finish that best suits your bathroom or kitchen while ensuring the durability that FineArt paper cannot provide in such environments.
FineArt prints are delicate and should always be handled with care. Avoid touching the printed surface with bare hands, as natural oils and fingerprints can damage it. Always handle prints by the edges, ideally while wearing clean cotton or nitrile gloves.
Keep the print flat and protected in its packaging until you are ready to frame it. Avoid rolling or bending, as repeated rolling/unrolling can cause fine cracks or creases in the surface that cannot be repaired. Never expose the unframed print to direct sunlight, humidity, or dust.
Don’t:
Don’t touch the printed surface.
Don’t attempt to clean or wipe the surface.
Don’t roll or unroll the print unnecessarily.
Don’t store it in damp, hot, or dusty conditions.
Payment methods
You can pay securely by credit/debit card (Visa, Mastercard, American Express, Discover), Apple Pay, Google Pay, PayPal, or Przelewy24 (P24, including BLIK for customers in Poland). Bank transfers, cheques, and cash on delivery are not accepted.
Currencies
Prices are shown and charged in one of three currencies: EUR, USD, or PLN.
After payment, you’ll receive an order confirmation and invoice by email. Digital downloads include an instant download link.
No, but I recommend it as it ensures:
Your account is only used for order management — no marketing or hidden subscriptions.
Print prices shown in the Shop do not include taxes or shipping costs. The total price is displayed at Checkout once you’ve selected your options and entered your shipping details.
For a full breakdown of pricing, currencies, taxes, and shipping, please see the PRINTS page.
VAT rates depend on your country of residence and whether you buy as a private individual or a registered company. Shipping fees vary by destination and order size. Both are calculated automatically at checkout so you can review the full amount before payment.
For a detailed explanation of VAT rules, shipping fees, and currencies, please visit the Prints page.
Please see the Additional Information section on the Prints page, where all details are organized in separate tabs:
If you still have questions, feel free to contact us directly.
Yes. Once your order is placed and payment is cleared, you automatically receive a VAT invoice by email. It lists the print price, shipping fee, and VAT (if applicable).
For your accounting records, always use the invoice sent by email, as it reflects the full amount you paid.
All prints are produced and shipped by WhiteWall, packaged securely in custom-made, shock-resistant boxes or crates. Despite these precautions, damage in transit can occasionally occur.
If your parcel or print arrives damaged, please follow these steps:
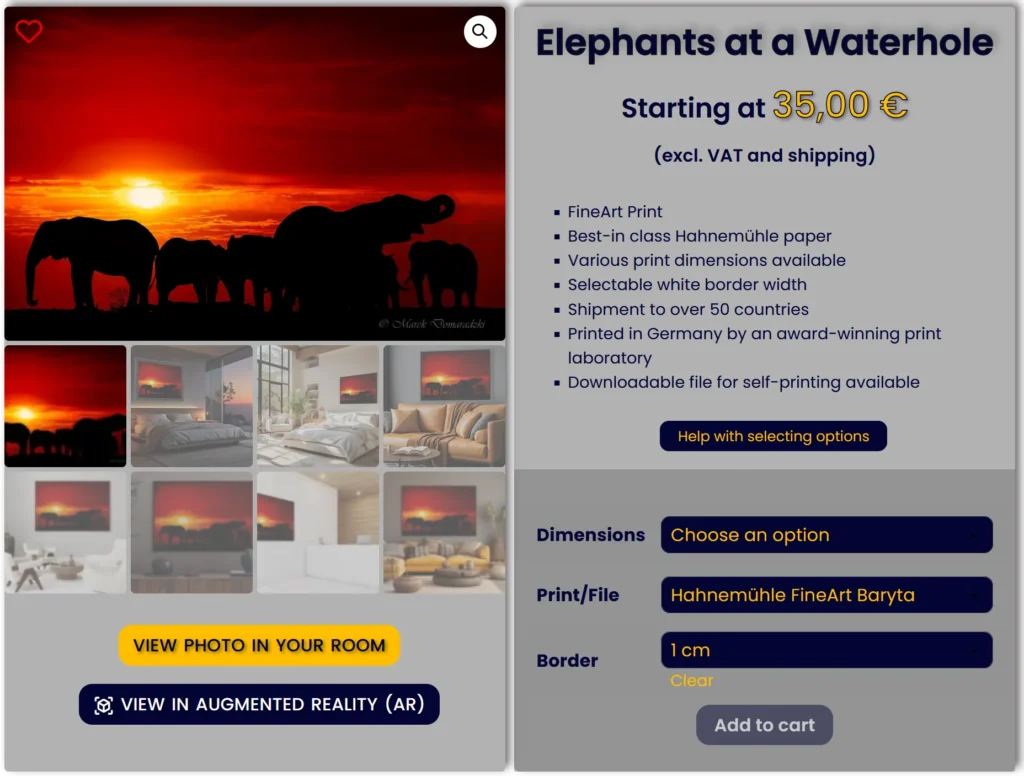
You need to select an option for each field (Dimensions, Print/File and Borders) to display the price and make the Add to Cart button active.
If you want to select a PRINT:
Once the options have been selected as intructed above, you will see the external dimensions of the print including the selected wide borders, the net price (excluding VAT and shipping) and you will be able to add the print to the cart.
NOTE: You also need to have all the options selected and the price displayed to view the photo in the selected size in Augmented Reality (AR). If options are not selected, the size of the print displayed in Augmented Reality (AR) will be 150×100 cm, which may not be the size you want.
If you want to select a FILE:
Once the options have been selected as intructed above, you will see the net price (excluding VAT) and you will be able to add the file to the cart.
If you get a message Sorry, no products matched your selection. Please choose a different combination., it means that you either haven’t selected the options as instructed above or the selected photo is not available in the selected dimensions.
Should you need more information, please see Prints or Contact us.
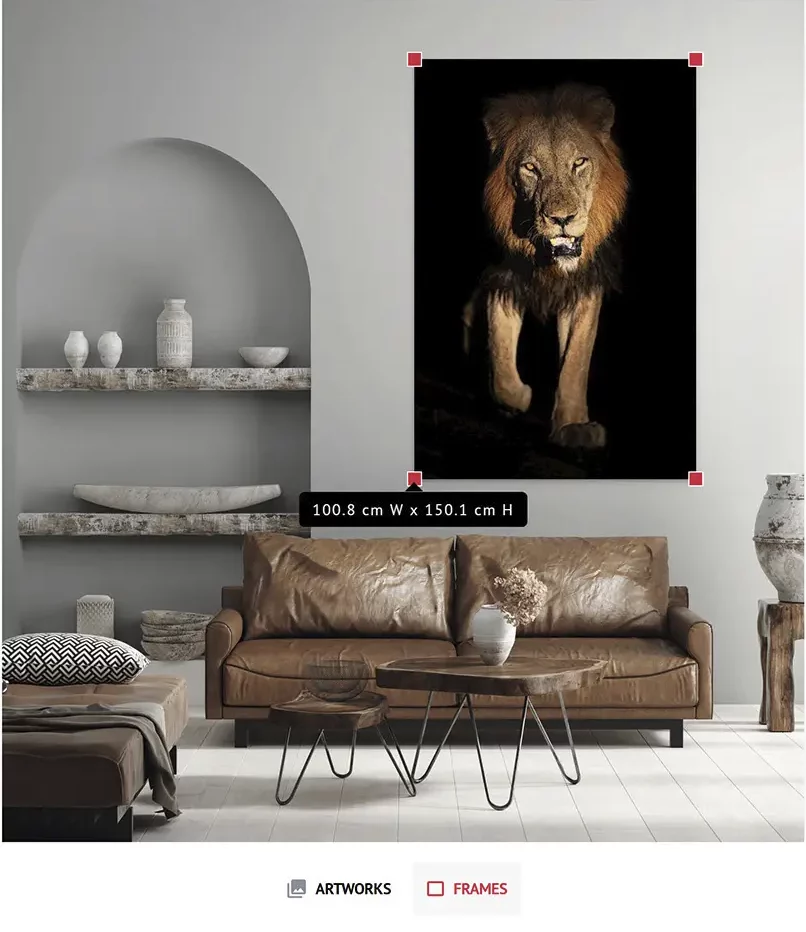
This is the second tool available on this website allowing you to view the selected photo on your wall and is intended to help you see how the selected photo will match your interior, combine with your furniture and room colors.
VIEW IN AUGMENTED REALITY (AR) – available on product pages – allows you to superimpose the selected photo on your wall, in scale, in real time through your mobile device camera.
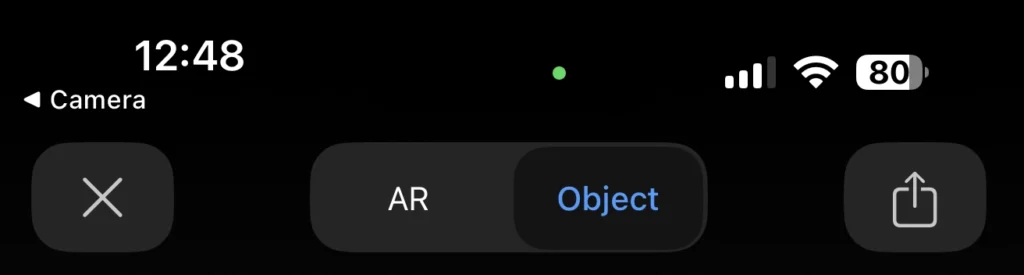
To use the tool, you don’t need to read the following information/instructions. You can just launch the tool wherever you see it available on this website and follow the on-screen prompts. If you, however, would like to know how the tool works before-hand and how to get the most of it, I recommend reading the following information. Anyway, you can always come back to this page if it turns out you need some help or additional information.
This feature allows you to view the selected photo on your wall and is intended to help you make up your mind which photo will match your interior, combine with your furniture and room colors, in what size and give you some idea about framing style you may like.
The VIEW PHOTO IN YOUR ROOM tool is accessible from each Product page.
Although you can use this tool on your mobile device, due to a much better viewing experience, we highly recommend using it on your desktop/laptop.
If you click on Help in the top right-hand corner of the screen, you will display a visual demonstration how to mark the area on your wall within which you will position and visualize your photo.
Please, note that the visual demontration (Help) can’t be launched from the slideshow level.
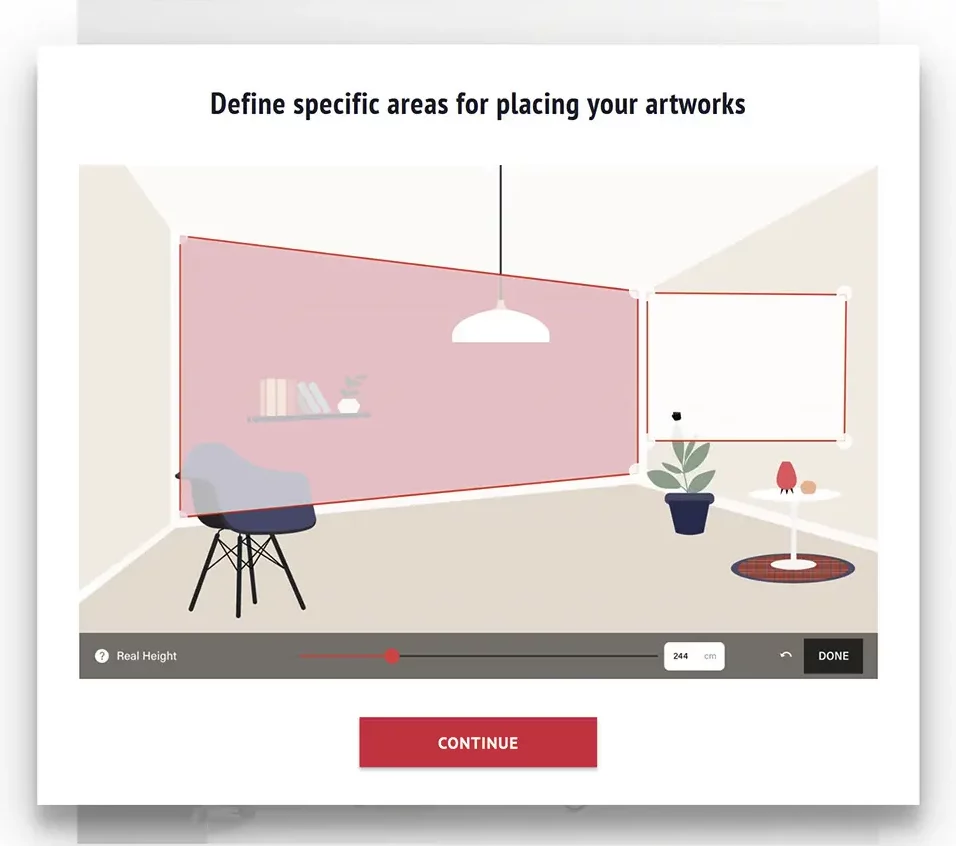
When watching the tutorial, please notice that if the walls in your uploaded room picture are shown in perspective, you have to mark the area accordingly.
Click the CONTINUE button to proceed.
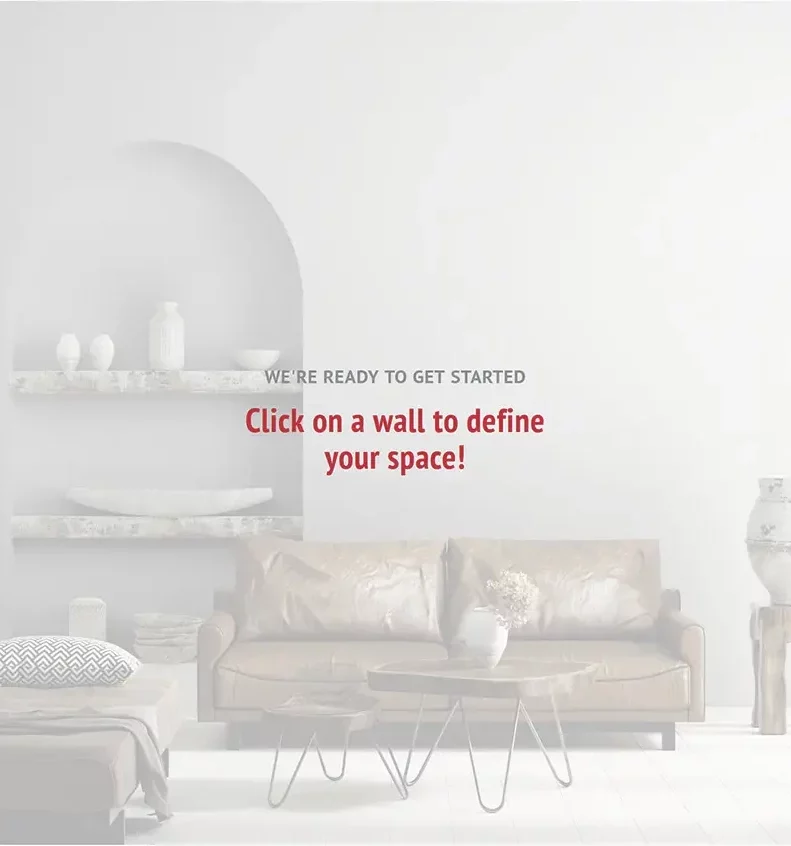
You will see a white rectangular area superimposed over your wall.
This is the area within which you will be able to virtually hang your photo.
You need to adjust the size of that white area.
Hint: We recommend marking a much bigger area than the photo itself as it will give you more flexibility with positioning and sizing of your photo or will allow you to place more photos side by side.
Hint: Your photo will always be positioned parallel to the sides of the white area. If you don’t have walls in perspective, don’t move the bigger corner/round handles.
You can click on the white area and reposition it on the wall.
Enter the real height of the area you have adjusted (not of the wall) in cm or drag the slider at the bottom of the screen until you get the correct height.
Please, note that the more accurately you provide the height, the more accurately the photo will be displayed in scale relative to the real dimensions of your interior.
Click the red DONE button.
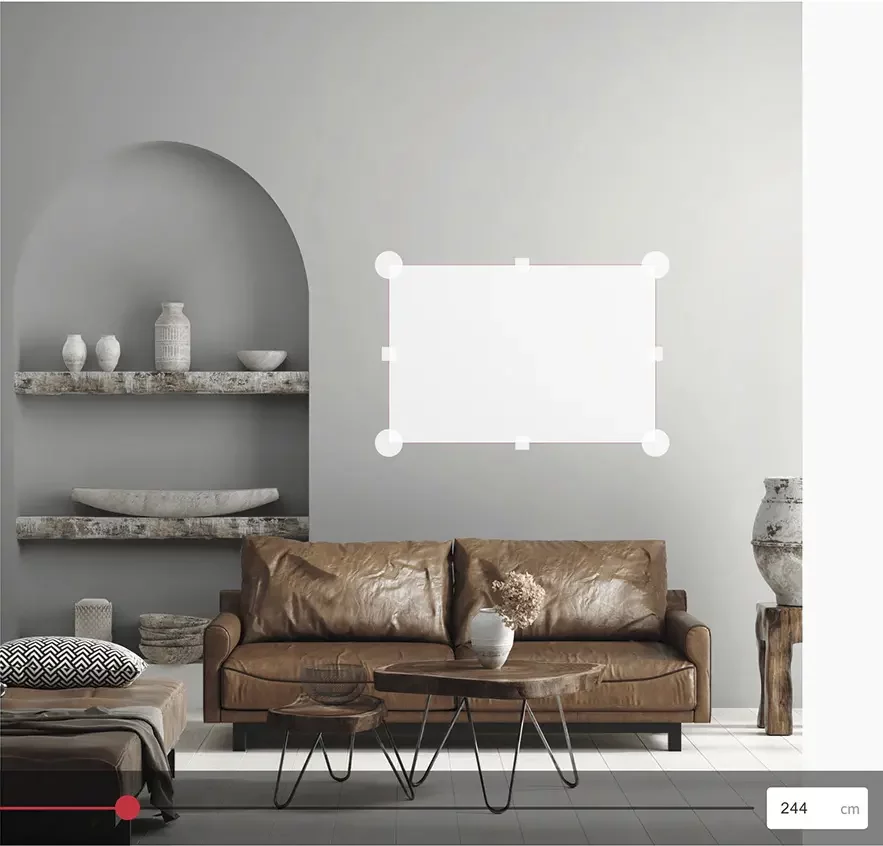
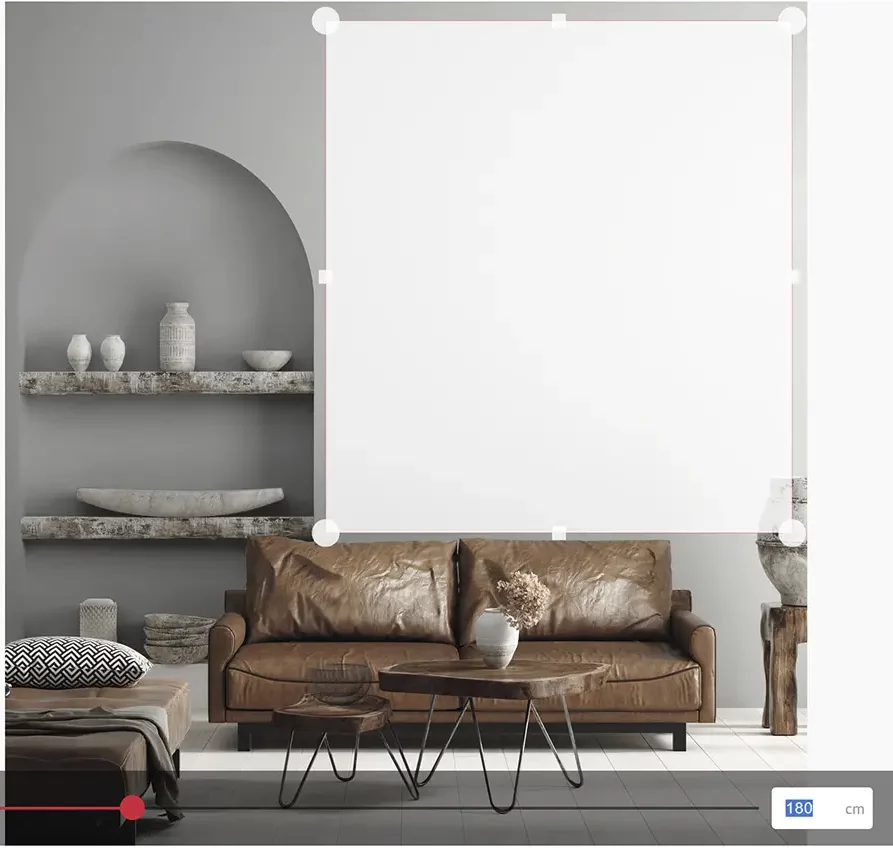
Drag the red corners to adjust the size of the photo.
Hint: If you first hover the mouse cursor over one of the red handles until the photo size is displayed and then start dragging the handle, you will see the changing dimensions while resizing the photo.
When adjusting the size, please bear in mind the standard sizes in which a given photo is available. You can display the adjusted photo size by hovering the mouse cursor over one of the red handles.
You can reposition the photo on you wall within the area you have marked previously.
If you hover the mouse cursor over the red handle, you will see the size of the photo in scale.
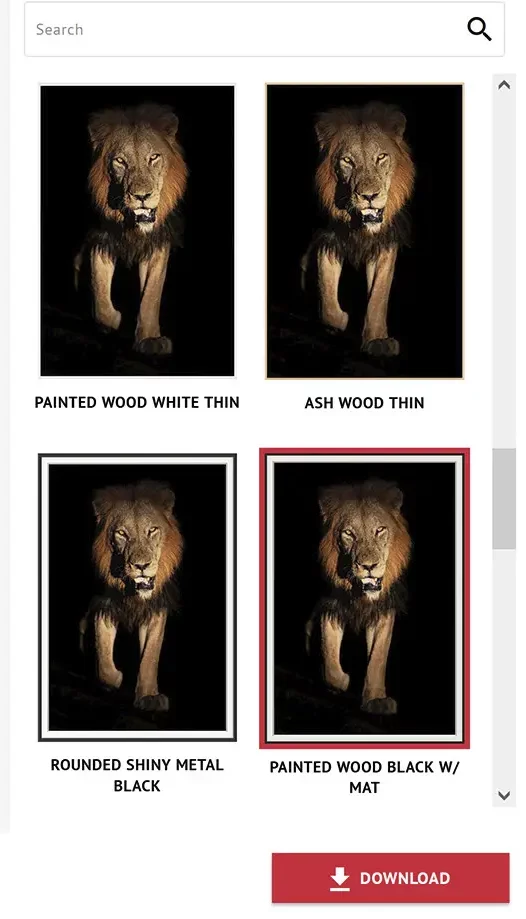
Click the ARTWORK button at the bottom of the screen to display the window with other photos. Click it again to close it.
If you want to change the photo, click the current photo (you will see the red handles) and the Delete key on your keyboard to make room for a different photo or drag the current photo out of the wall area.
You can search photos by name typing it in the Search box and/or select photos from different galleries using a drop-down list.
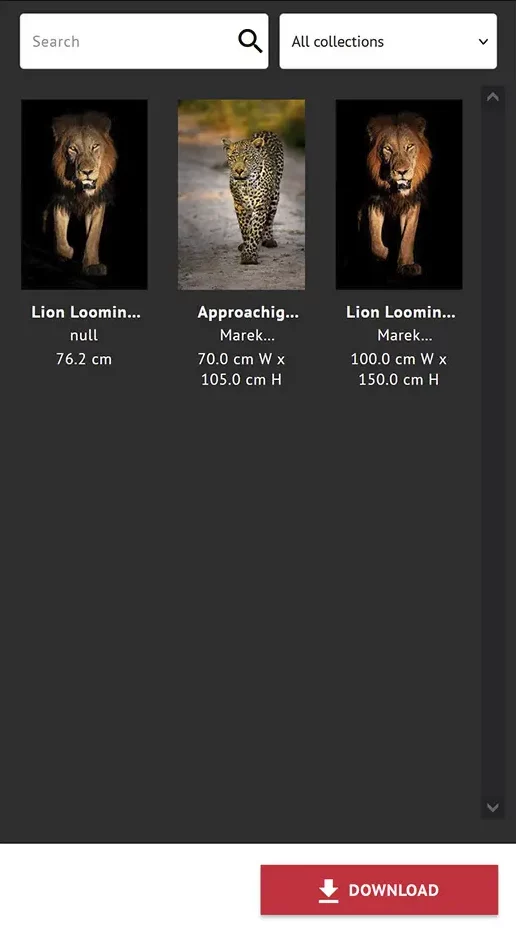
Hint: Artworks are simply the photos you can also see on the Galleries and Shop pages and in the Virtual Exhibitions. They are categorized into galleries in the exactly same way.